Connectivity
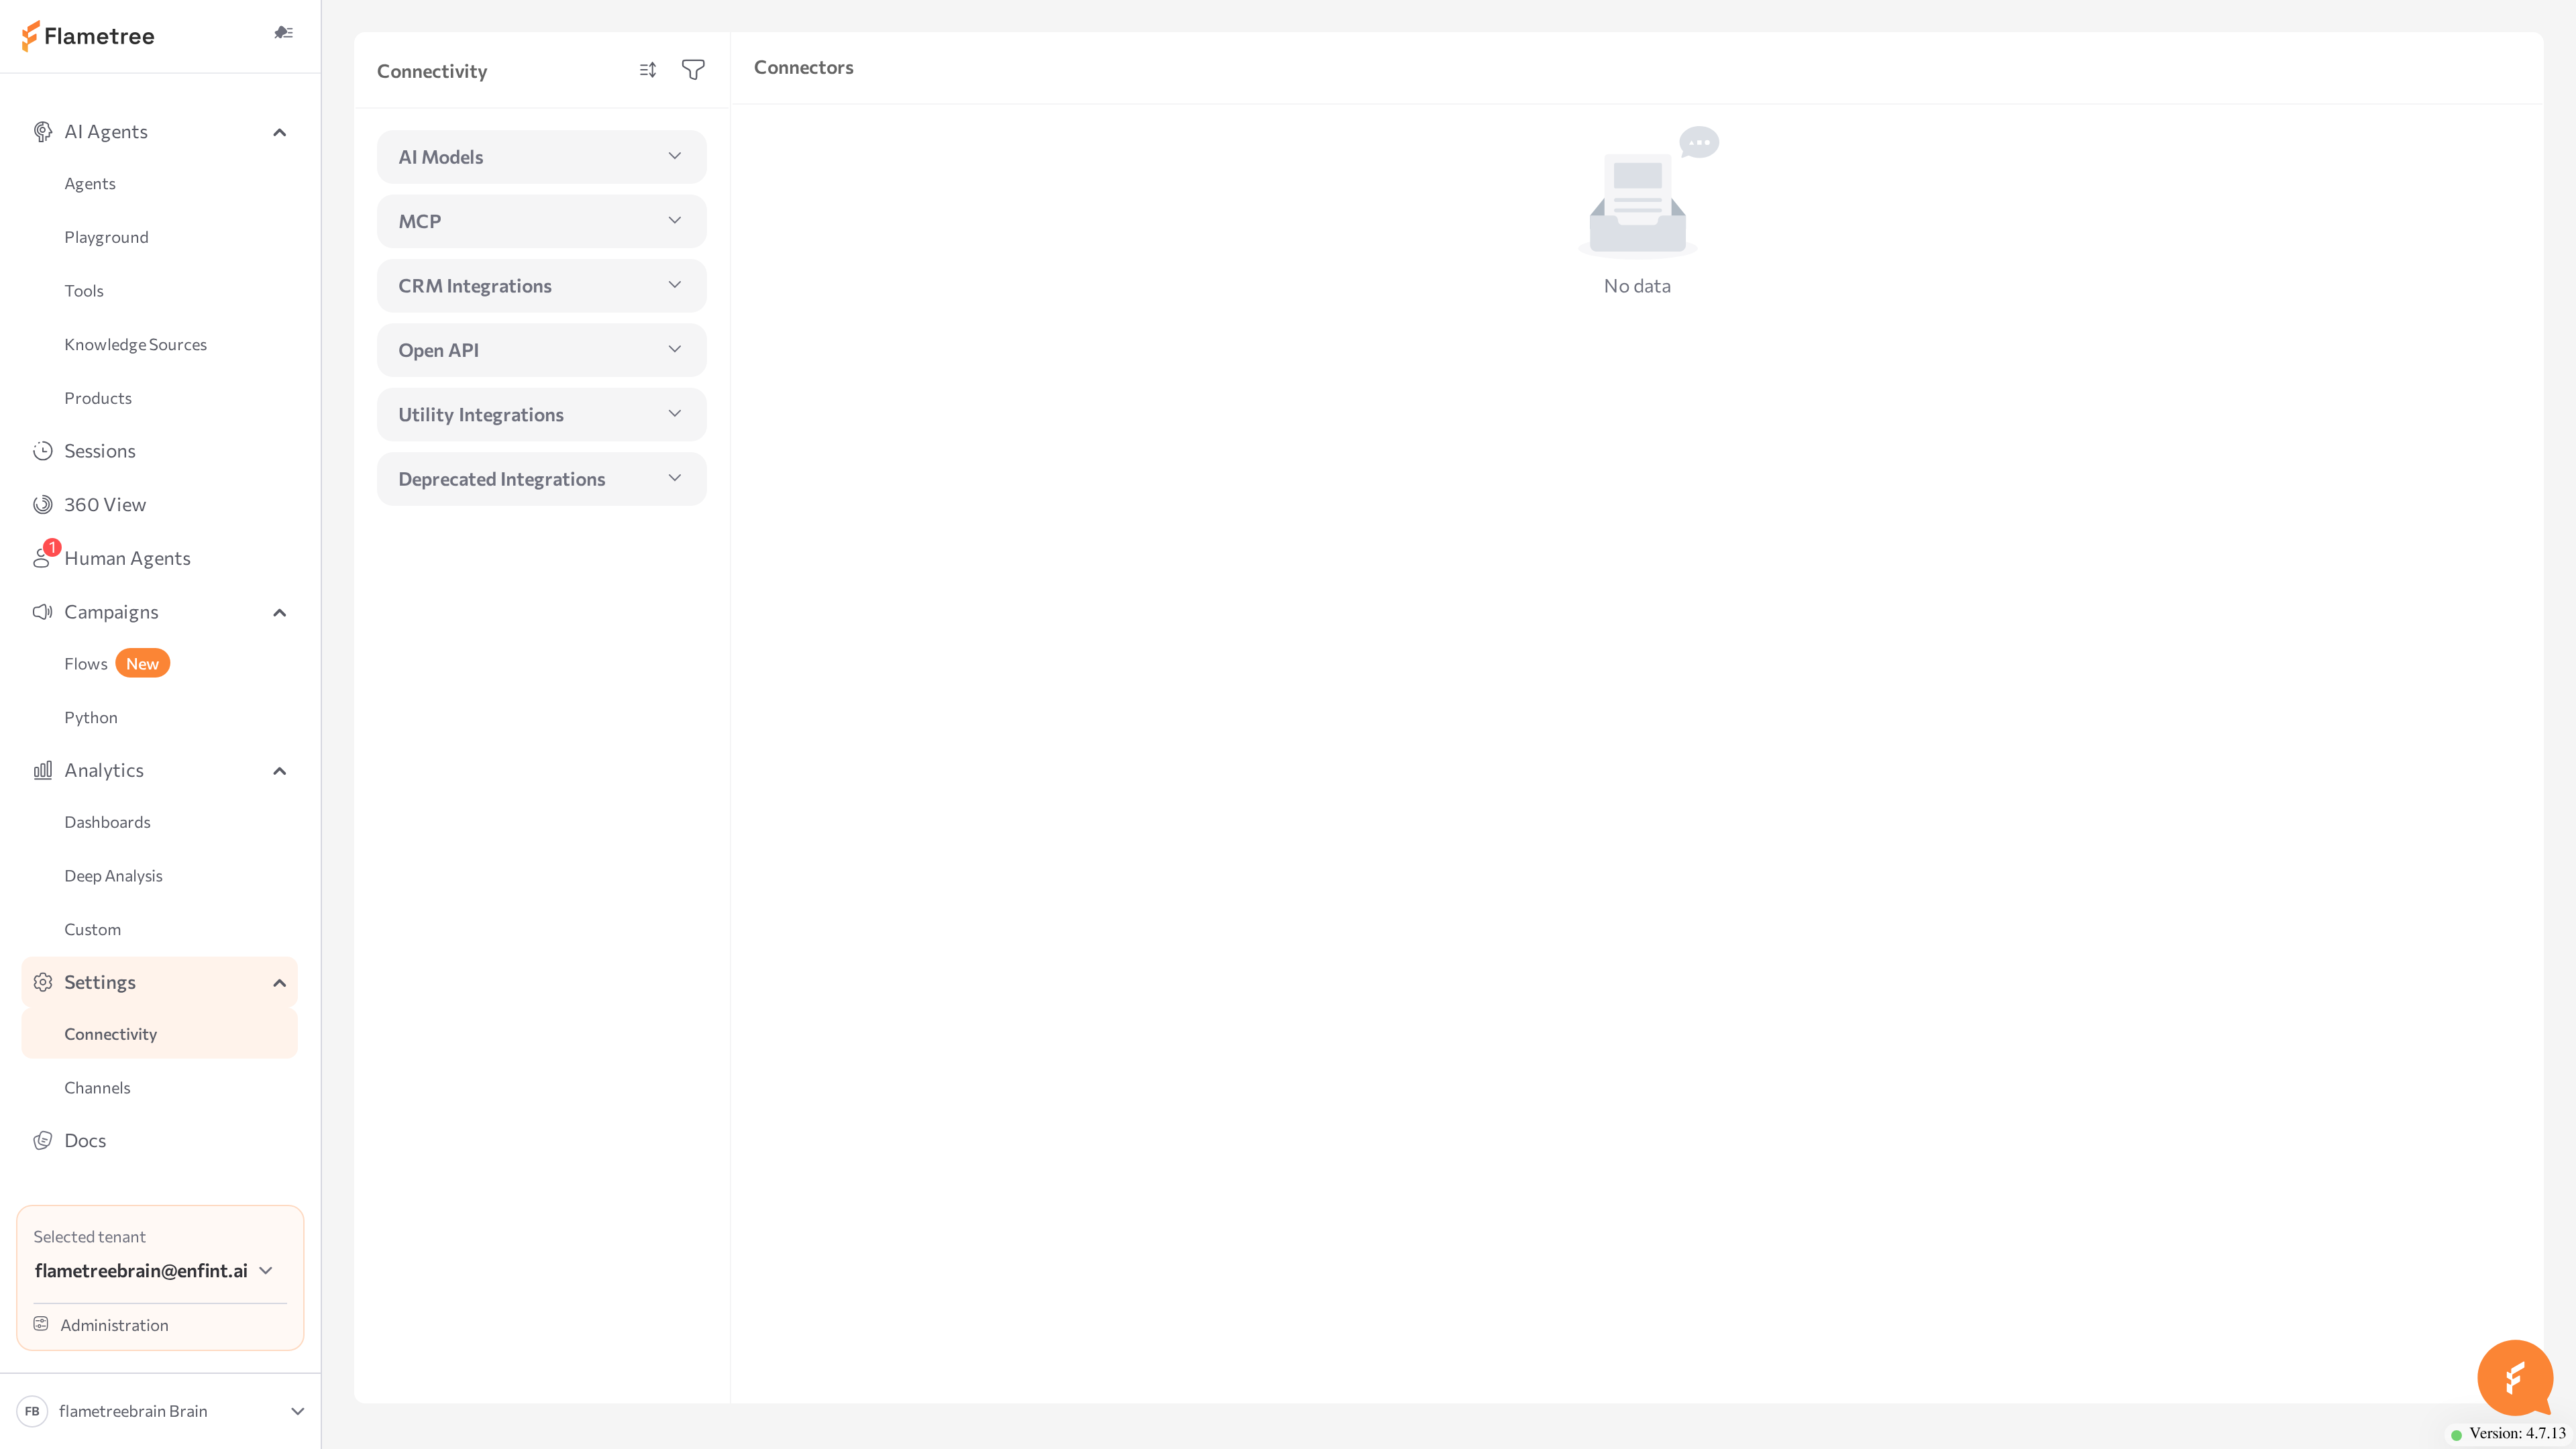
The Connectivity screen is your tenant's registry of integrations — the connections between Flametree and the external services your AI agents rely on: language models, speech services, tools, and databases. You create a connection once, then use it from any number of agents — open the screen from Settings > Connectivity in the left menu.
Use it to:
- Set up a tenant for the first time with a working LLM connection.
- Connect your own model endpoint, provider account, or API keys.
- Check whether an existing connection is healthy.
- Choose which connection agents use by default.
Messaging and voice channels (web widget, WhatsApp, Telegram, and so on) are connected on Settings > Channels, not here.
Before you start
- You are signed in to the portal. Adding and editing connectors requires the corresponding permission — if the Add button is disabled, ask your administrator.
- You have the credentials for the service you want to connect. For an LLM, that is the API URL, an access token, and the model name from your provider.
Find your way around
The screen has three panels, left to right:
- Integration categories (left) — collapsible groups of integration types: AI Models, MCP, CRM Integrations, Open API, Utility Integrations, and Deprecated Integrations. Types under Deprecated Integrations are kept for backward compatibility and marked DEPRECATED — don't use them for new setups.
- Connectors (center) — the connections created for the selected type. Filter the list with the search box (Enter connector name or property value), or click Add to create a new connector.
- Details (right) — opens when you add or select a connector and shows the editable form. The panel header reads New connector while you create and Details while you edit.
A connector is one configured instance of an integration type. You can create several connectors of the same type — for example, two LLM connectors that point to different providers — and choose per agent which one to use.
In the Connectors panel, move between cards with the Up and Down arrow keys, press Enter to open the selected connector, and press Escape to close the details panel.
Read a connector card
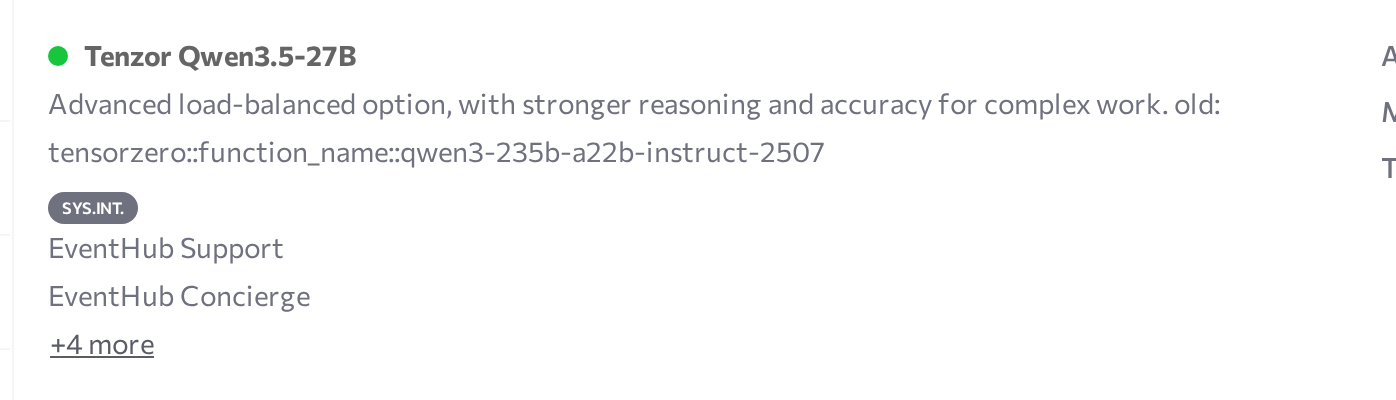
Each card in the Connectors panel shows:
- Status dot — a colored dot next to the name; hover over it to read the latest status message, including the error text if a check failed. See Check integration status.
- Name and description — the values you entered.
- Tags — DEFAULT for the default connector of its type, SYS.INT. for a system integration provided with the platform. See Default vs custom integrations.
- Linked agents — the agents currently using this connector. Click an agent name to open it in a new tab; long lists collapse behind +N more.
- Key parameters — a quick view of the main non-secret parameter values.
Default vs custom integrations
Connector cards can carry two tags that are easy to confuse:
| Tag | What it means |
|---|---|
| SYS.INT. | A system integration — pre-configured and maintained by the platform, shared with your tenant. Its parameters cannot be edited. |
| DEFAULT | The default connector of its integration type in your tenant. Agents use the default unless a different connector is selected for them. |
A connector can carry both tags, one of them, or neither — any connector, system or custom, can be made the default.
| Aspect | System integrations | Custom integrations |
|---|---|---|
| Configuration | Pre-configured for you | Created and configured by you |
| Availability | Ready as soon as you get platform access | Must be set up first |
| Editability | Parameters cannot be edited from your tenant | Fully editable |
| Credentials | Platform account | Your own provider account and keys |
System integrations are the quick start: use them while you evaluate the platform or when the standard configuration meets your needs. Create custom integrations when you have your own provider account, endpoint, or model deployment, need specific configuration values, or want usage billed to your own account.
If you try to save changes to a system integration, the portal shows Changes to system integrations can only be made in the public tenant. The only thing you can change on a system integration is its Make default state. The connector form also shows a System integration switch — it is meant for platform operators; leave it off.
Add an LLM integration
Every AI agent needs a Large Language Model (LLM) connection — the model that understands customer messages and generates replies. The LLM type connects any model behind an OpenAI-compatible API: OpenAI, Azure OpenAI, Mistral, DeepInfra, a self-hosted model, and others.
-
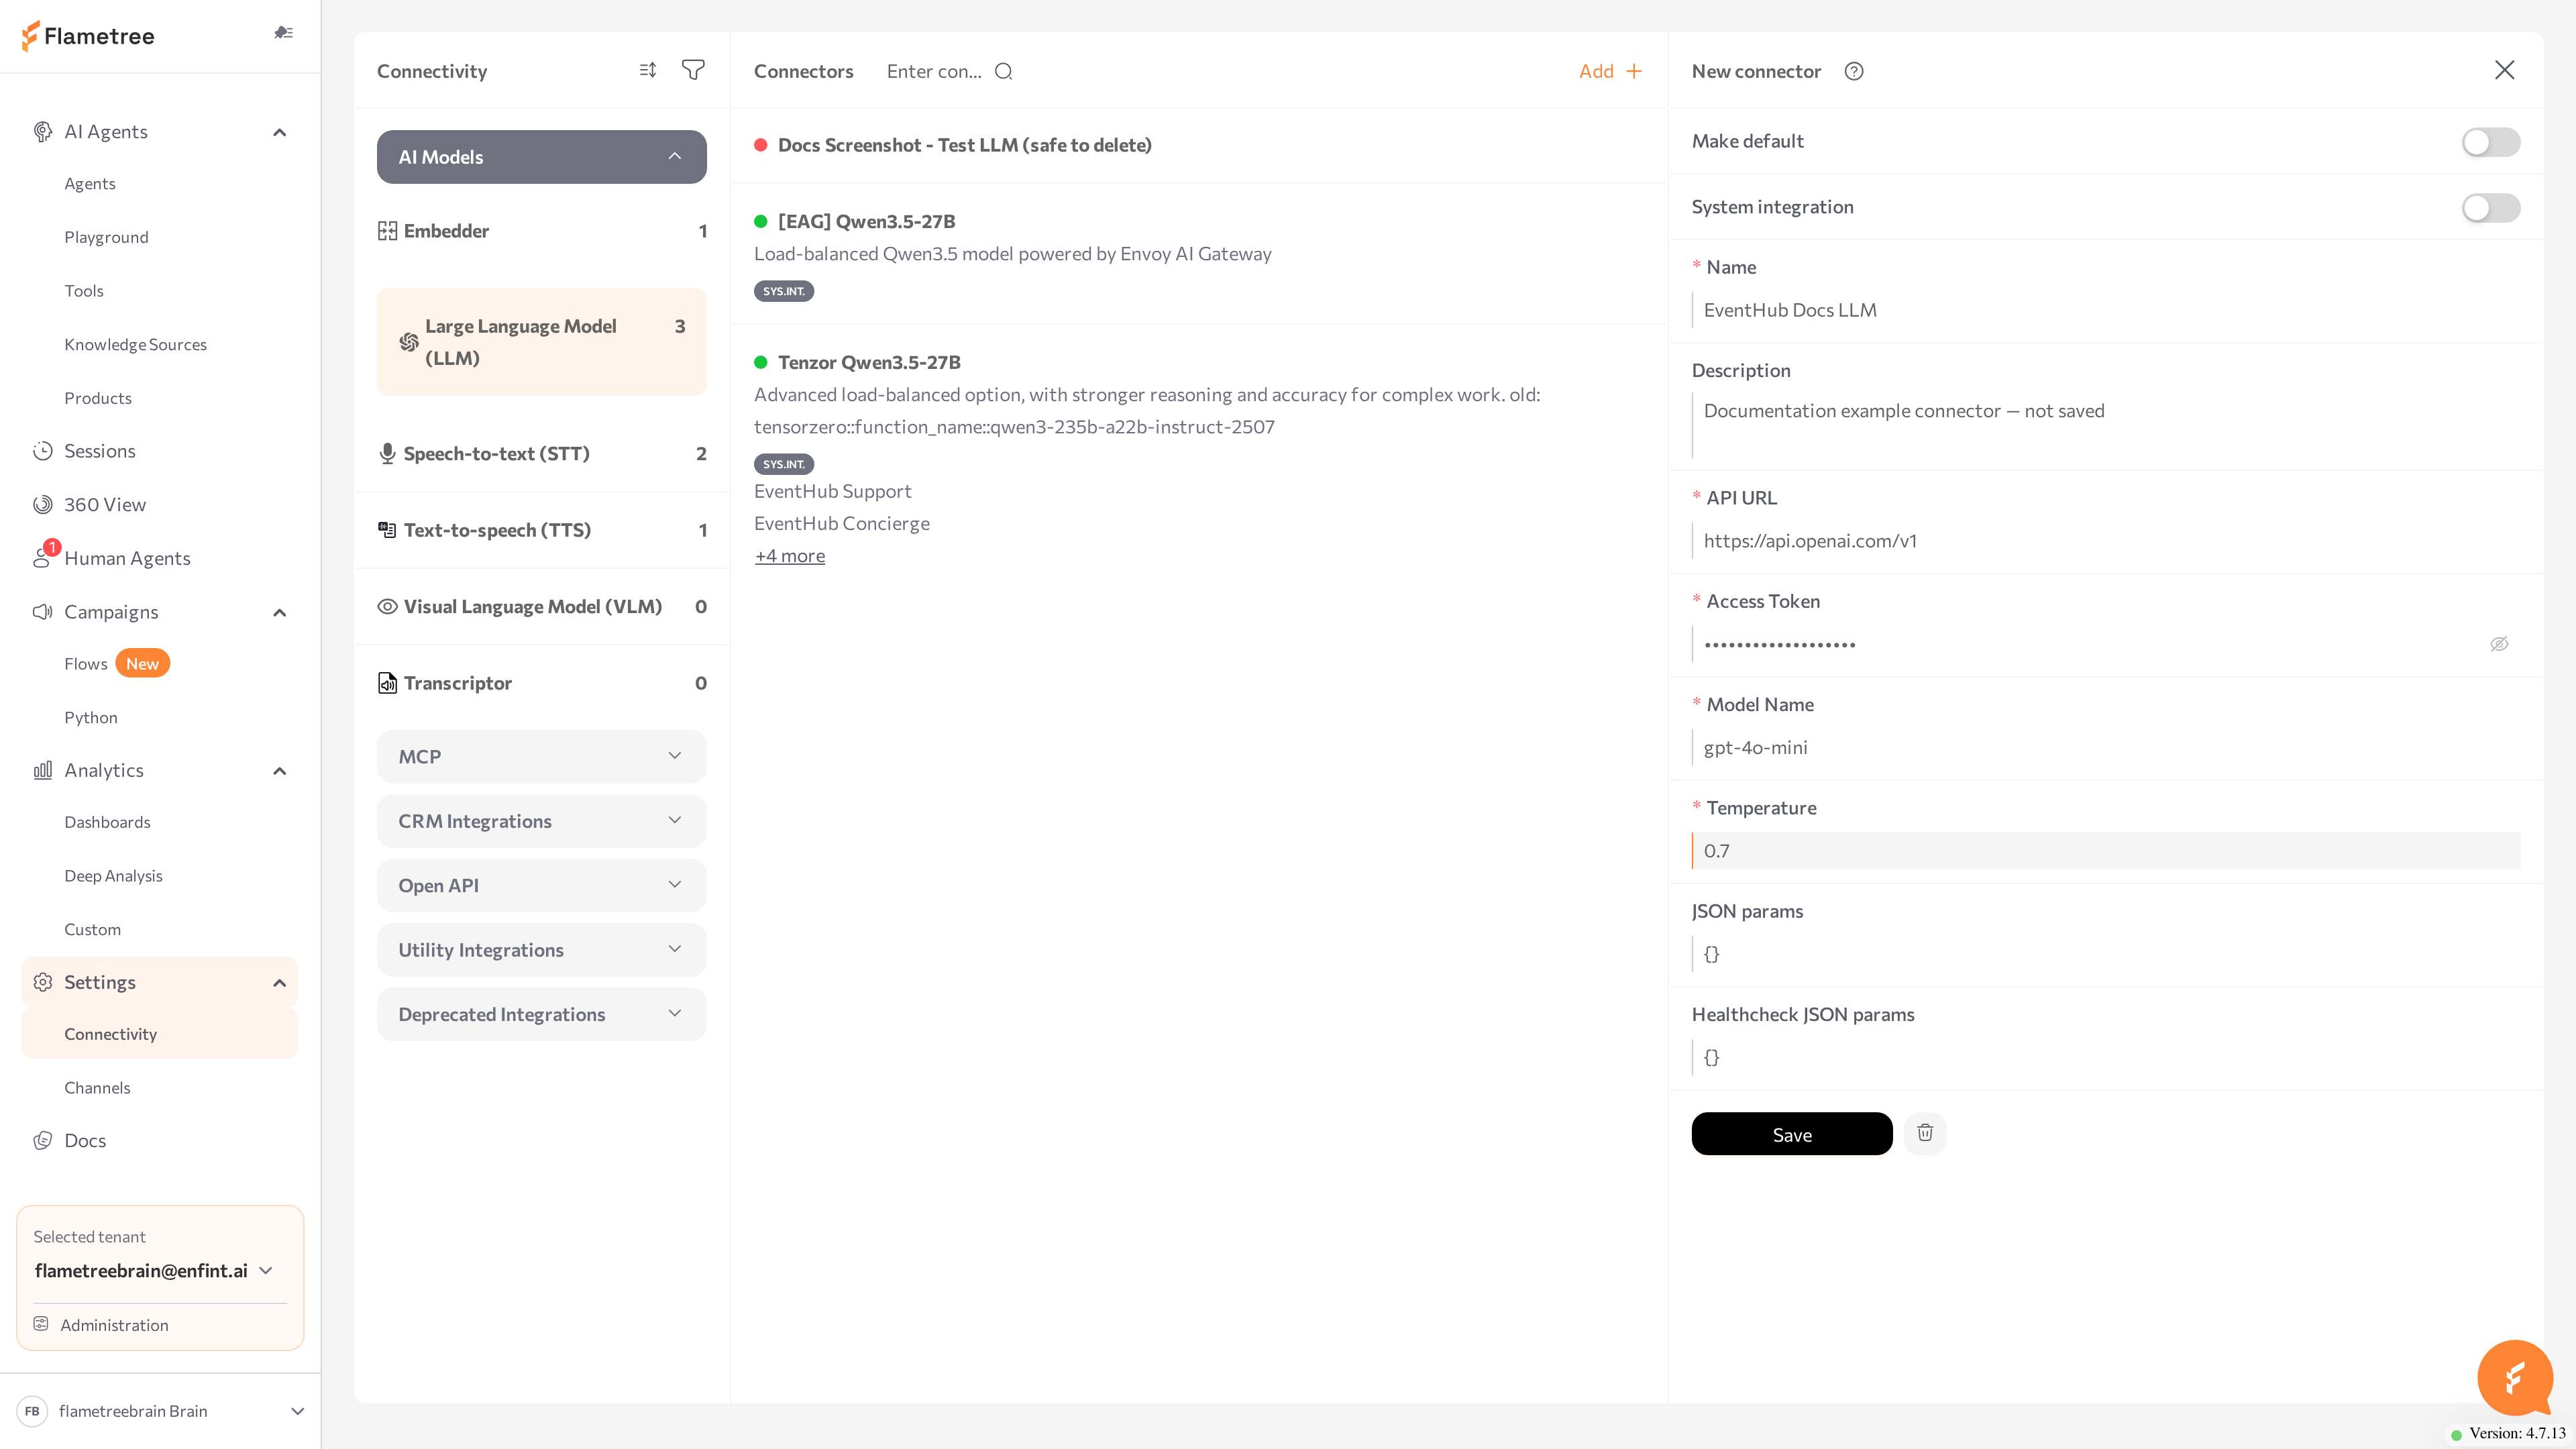
Go to Settings > Connectivity.
-
In the left panel, open AI Models and select Large Language Model (LLM).
-
Click Add. The New connector panel opens.
-
Fill in the fields:
Field Required Description Name Yes A name for the connector, unique within your tenant — for example, OpenAI gpt-4o prod.Description No What the connector is for and who owns the account. API URL Yes The OpenAI-compatible base URL of the provider — for example, https://api.openai.com/v1for OpenAI orhttps://api.deepinfra.com/v1/openaifor DeepInfra.Access Token Yes The API key issued by the provider. Stored as a secret and shown masked after saving. Model Name Yes The model identifier exactly as the provider expects it — for example, gpt-4o.Temperature Yes How creative the replies are. See Choose a temperature. JSON params No Additional model parameters as a JSON object, passed to the provider with each request — for example, {"max_tokens": 1024}. Which keys are supported depends on your provider; leave it empty if unsure. -
Optional: turn on Make default so agents use this connector when no other one is selected.
-
Click Save.
The portal confirms with Integration created successfully, and the connector appears in the Connectors list. Flametree then tests the connection by sending a real request to the model — once the check completes, the card shows a green status dot. Hover over the dot to read the status message.
Other integration types follow the same pattern: select the type in the left panel, click Add, complete the type-specific form, and save. See Add other integrations for the fields each one needs.
Choose a temperature
| Value | Model behavior |
|---|---|
| 0.0 | Accurate and deterministic. Best for support agents and anything fact-based. |
| 0.7 | Balanced between accuracy and creativity — works for most conversational agents. |
| 1.0 | Highly creative and less predictable. Suited to brainstorming and marketing copy. |
Start with a low temperature (0 to 0.3) for customer-support agents and raise it only if replies feel too rigid. Use values your model provider documents.
Add other integrations
Every integration type is created the same way: select the type in the left panel, click Add, fill in the form, optionally turn on Make default, and click Save. Each section below lists the fields specific to that type and one way to confirm the connection works. The shared fields — Name (required) and Description — and the Make default and System integration switches work as described under Add an LLM integration.
Which connectors an agent uses is set on the agent page in Advanced mode, in the Models section of the Settings panel.
Add an embedding model
An embedder turns text into vectors for semantic search. Knowledge Sources uses it to index your content so the agent can retrieve the most relevant passages. Open AI Models > Embedder and click Add.
| Field | Required | Description |
|---|---|---|
| API URL | No | The OpenAI-compatible base URL of the embedding provider — for example, https://api.openai.com/v1. |
| Access token | No | The API key issued by the provider. Stored as a secret and shown masked after saving. |
| Model Name | No | The embedding model identifier as the provider expects it — for example, text-embedding-3-small. |
| Encoding format | No | The vector encoding the provider returns: float or base64. Leave it empty unless your provider requires a specific value. |
Although the fields are not individually marked required, an embedder needs the URL, token, and model name to work. After you save, the card shows a green status dot once the health check completes. Attach the connector to an agent as its embedding model in Advanced mode, then index a knowledge source and run a search in the Playground.
Add speech integrations for voice agents
Voice agents need two speech connections: one to transcribe the caller and one to read replies aloud. Set them up here, then attach them to the agent in Advanced mode. They are used by the SIP voice channel. The Twilio channel does not need them — it uses Twilio's built-in speech.
Speech-to-text (STT) — open AI Models > Speech-to-text (STT) and click Add.
| Field | Required | Description |
|---|---|---|
| API URL | Yes | The OpenAI-compatible base URL of the speech-to-text service. |
| Access token | No | The API key issued by the provider. Stored as a secret. |
| Type | No | The transcription engine — for example, whisper or local_whisper. |
| Model name | No | The transcription model identifier as the provider expects it. |
| Certificate | No | A client certificate, when the service requires one. Stored as a secret. |
After you save, the card shows a green status dot once the health check completes.
Text-to-speech (TTS) — open AI Models > Text-to-speech (TTS) and click Add.
| Field | Required | Description |
|---|---|---|
| API URL | Yes | The OpenAI-compatible base URL of the text-to-speech service. |
| Access token | No | The API key issued by the provider. Stored as a secret. |
| Type | Yes | The synthesis engine — for example, open_voice, azure_speech, or eleven_labs. |
| Region | No | The provider region, when the service uses one. |
| Voice | No | The voice name to read replies in. |
| Speech speed | No | The speaking rate. |
Text-to-speech connections are not health-checked, so they show no status dot. To confirm one works, attach it to a voice agent and place a test call through the SIP channel.
To transcribe stored audio files rather than a live call, use AI Models > Transcriptor, which takes an API URL (required) and an Access Token. Transcriptor connections are health-checked and show a status dot.
Add a CRM integration (Intercom)
The Intercom integration lets an agent assist inside Intercom as a copilot — drafting and posting replies through the Intercom API. This is distinct from the Intercom channel, which routes whole Inbox conversations to an agent and is set up in Settings > Channels. Use this integration only for the copilot modes below. Open CRM Integrations > Intercom and click Add.
| Field | Required | Description |
|---|---|---|
| API URL | Yes | The Intercom API base URL. |
| Access token | Yes | The Intercom access token. Stored as a secret and shown masked after saving. |
| Admin ID | Yes | The ID of the Intercom teammate the agent acts as. |
| Type | Yes | The copilot mode: copilot, copilot_private, or hybrid. |
This integration is not health-checked, so it shows no status dot. To confirm it works, attach it to an agent and check that the agent posts in your Intercom workspace.
Add a database integration
A database connection lets an agent's tools read from and write to your SQL database. Open Utility Integrations > Database and click Add.
| Field | Required | Description |
|---|---|---|
| Database name | Yes | The name of the database to connect to. |
| Host | Yes | The database server host. |
| Port | Yes | The database server port. |
| Username | Yes | The database user. |
| Password | Yes | The user's password. Stored as a secret and shown masked after saving. |
Database connections are not health-checked, so they show no status dot. To confirm the connection works, attach it to an agent whose tools query the database and run one of those tools in the Playground.
A Mail connection (under Utility Integrations) lets an agent send email over SMTP. It takes an Address and SMTP server (both required), a Password, an SMTP port (default 465), and an optional send rate. Mail connections are not health-checked.
Add OpenAPI tools
The OpenAPI Tools type turns an OpenAPI specification into a set of HTTP tools the agent can call. Open Open API > OpenAPI Tools and click Add.
| Field | Required | Description |
|---|---|---|
| API URL | Yes | The base URL the generated tools call. |
| Spec URL | Yes | The URL of the OpenAPI specification to read. |
| Code | No | A short prefix added to the generated tool names. |
| Auth type | No | The authentication scheme the API uses — for example, basic, bearer, or API key. Fill in the matching credential fields below it (username and password, bearer token, or API key value and header). |
| Tool list | — | Read-only. After you save, it lists the tools generated from the specification. |
The form also has optional filters — include or exclude paths, tags, and HTTP methods — to limit which endpoints become tools. After you save, confirm the Tool list field is populated, then attach the connection to an agent in Advanced mode so the agent can call the tools. See Tools for how an agent's tools work.
Add MCP tools
The MCP Tools type connects a Model Context Protocol server, which provides tools the agent can call. Open MCP > MCP Tools and click Add.
| Field | Required | Description |
|---|---|---|
| Integration Code | Yes | A short identifier used as a prefix for this server's tools. |
| Server Endpoint | Yes | The MCP server endpoint — a URL or a command. |
| Transport Protocol | No | How the platform reaches the server: streamable_http (default), http_sse, or stdio. |
| Authentication Type | No | The authentication method: none (default), bearer, token, api_key, basic, or custom. Fill in the matching credential fields below it. |
| Tool list | — | Read-only. After you save, it lists the tools discovered on the server. |
The form also exposes optional include and exclude filters for the server's tools and connection-pool settings. After you save, confirm the Tool list field shows the discovered tools, then attach the connection to an agent in Advanced mode. See Tools for how an agent's tools work.
Check integration status
Flametree tests connections that support health checks by making a real call to the service. The result is shown as a dot on the connector card:
| Dot | Status | Meaning |
|---|---|---|
| Green | Healthy | The last test call succeeded. |
| Red | Unhealthy | The last test call failed. Hover over the dot to see the error. |
| No dot | Not checked | Required parameters are missing, or this integration type is not health-checked. |
Health checks run for Large Language Model (LLM), Visual Language Model (VLM), Embedder, Speech-to-text (STT), and Transcriptor connectors. Checks repeat periodically in the background, and the screen updates automatically.
Other types — Text-to-speech (TTS), Intercom, Database, Mail, OpenAPI Tools, and MCP Tools — are not health-checked and never show a status dot. Confirm these instead by attaching the connector to an agent and exercising it: for OpenAPI and MCP, check that the connector's Tool list is populated after saving; for the others, run a tool or message that uses the connection in the Playground.
Edit, delete, or set the default
Edit a connector
- Select the connector card. The Details panel opens with the form.
- Change the values you need. Secret fields such as Access Token show masked values — leave them untouched to keep the stored value, or type over them to replace it.
- Click Save.
System integrations (SYS.INT.) cannot be edited — create a custom connector of the same type with your own values instead.
Set a connector as the default
- Select the connector card.
- In the Details panel, turn on Make default.
- Click Save.
The card now shows the DEFAULT tag, and the previous default of the same type loses it — there is one default per integration type in a tenant.
Delete a connector
- Check the Linked agents list on the card — deleting a connector removes it from every agent it is linked to.
- Select the connector and click the delete (trash) button in the Details panel.
- Confirm the deletion.
Deleting an LLM connector that agents use leaves those agents without a model — they stop responding until another LLM is attached. Re-link the agents first.
Common issues
- Red status dot after saving. The service rejected the test call. Hover over the dot to read the provider's error, then check: API URL is the base URL and usually ends with
/v1(don't include/chat/completions); Access Token is valid, active, and has quota left; Model Name matches the provider's identifier exactly, including dots and dashes. - No status dot. For an LLM connector, one of API URL, Access Token, or Model Name is missing — the connection isn't tested until all three are set. Some integration types are never health-checked.
- Integration with name ... already exists. Connector names must be unique within your tenant. Pick a different name.
- Changes to system integrations can only be made in the public tenant. Connectors tagged SYS.INT. are managed by the platform; you can only change their Make default state. Create a custom connector with your own values instead.
- The Add button is disabled. Your role doesn't include the permission to add connectors. Ask your administrator.
- The DEFAULT tag didn't move. The default is set per integration type. Turn on Make default on the new connector and save — the tag is released from the previous default automatically.
- Agent replies fail although the dot is green. The health check validates the connection, not your quota for sustained traffic. Check rate limits and billing on the provider's side.
- An OpenAPI or MCP connector's Tool list is empty after saving. The platform could not read the tools. For OpenAPI, check the Spec URL points to a reachable OpenAPI specification and that any path, tag, or method filters are not excluding everything. For MCP, check the Server Endpoint and Transport Protocol match the server, and that the authentication fields are correct. Save again to retry discovery.
- A database tool fails to connect. Check Host, Port, Database name, Username, and Password, and that the database accepts connections from the platform's network.
- The Intercom agent posts nothing. For the Intercom integration, check the Access token is valid and the Admin ID matches a real teammate. If you meant to route whole Inbox conversations rather than run a copilot, set up the Intercom channel instead — the two are configured separately.
- A voice agent answers but stays silent. The agent is missing its speech connections. Confirm a Speech-to-text (STT) and a Text-to-speech (TTS) connector exist here and are attached to the agent in Advanced mode.
Related pages
- Settings > Channels — connect messaging and voice channels
- Agents — create and manage the agents that use these connections
- Advanced mode — attach models, speech, tools, and channels to an agent
- Tools — how an agent's tools work
- Knowledge Sources — content the embedding model indexes for search
- SIP — voice calls that use the speech connections
- Twilio — voice calls with Twilio's built-in speech
- Quick start — create your first agent