Capabilities
The Capabilities screen is where you build the custom actions your AI agents can perform during a conversation — looking up an order, creating a support ticket, posting a lead to your CRM. Open it from AI Agents > Capabilities in the left menu.
You don't need custom tools for standard capabilities: answering from knowledge sources, collecting conversation results, and human handoff are built into Flametree. Build a tool when an agent must work with your own systems.
The left menu currently shows both Tools and Capabilities under AI Agents. This page covers Capabilities, where a tool is created from Python code through the portal's own forms. Tools is the earlier screen, where a tool group is one uploaded YAML file plus its Python code — still functional, still linked from the menu, and covered on its own page, Tool Groups (Legacy).
Find your way around
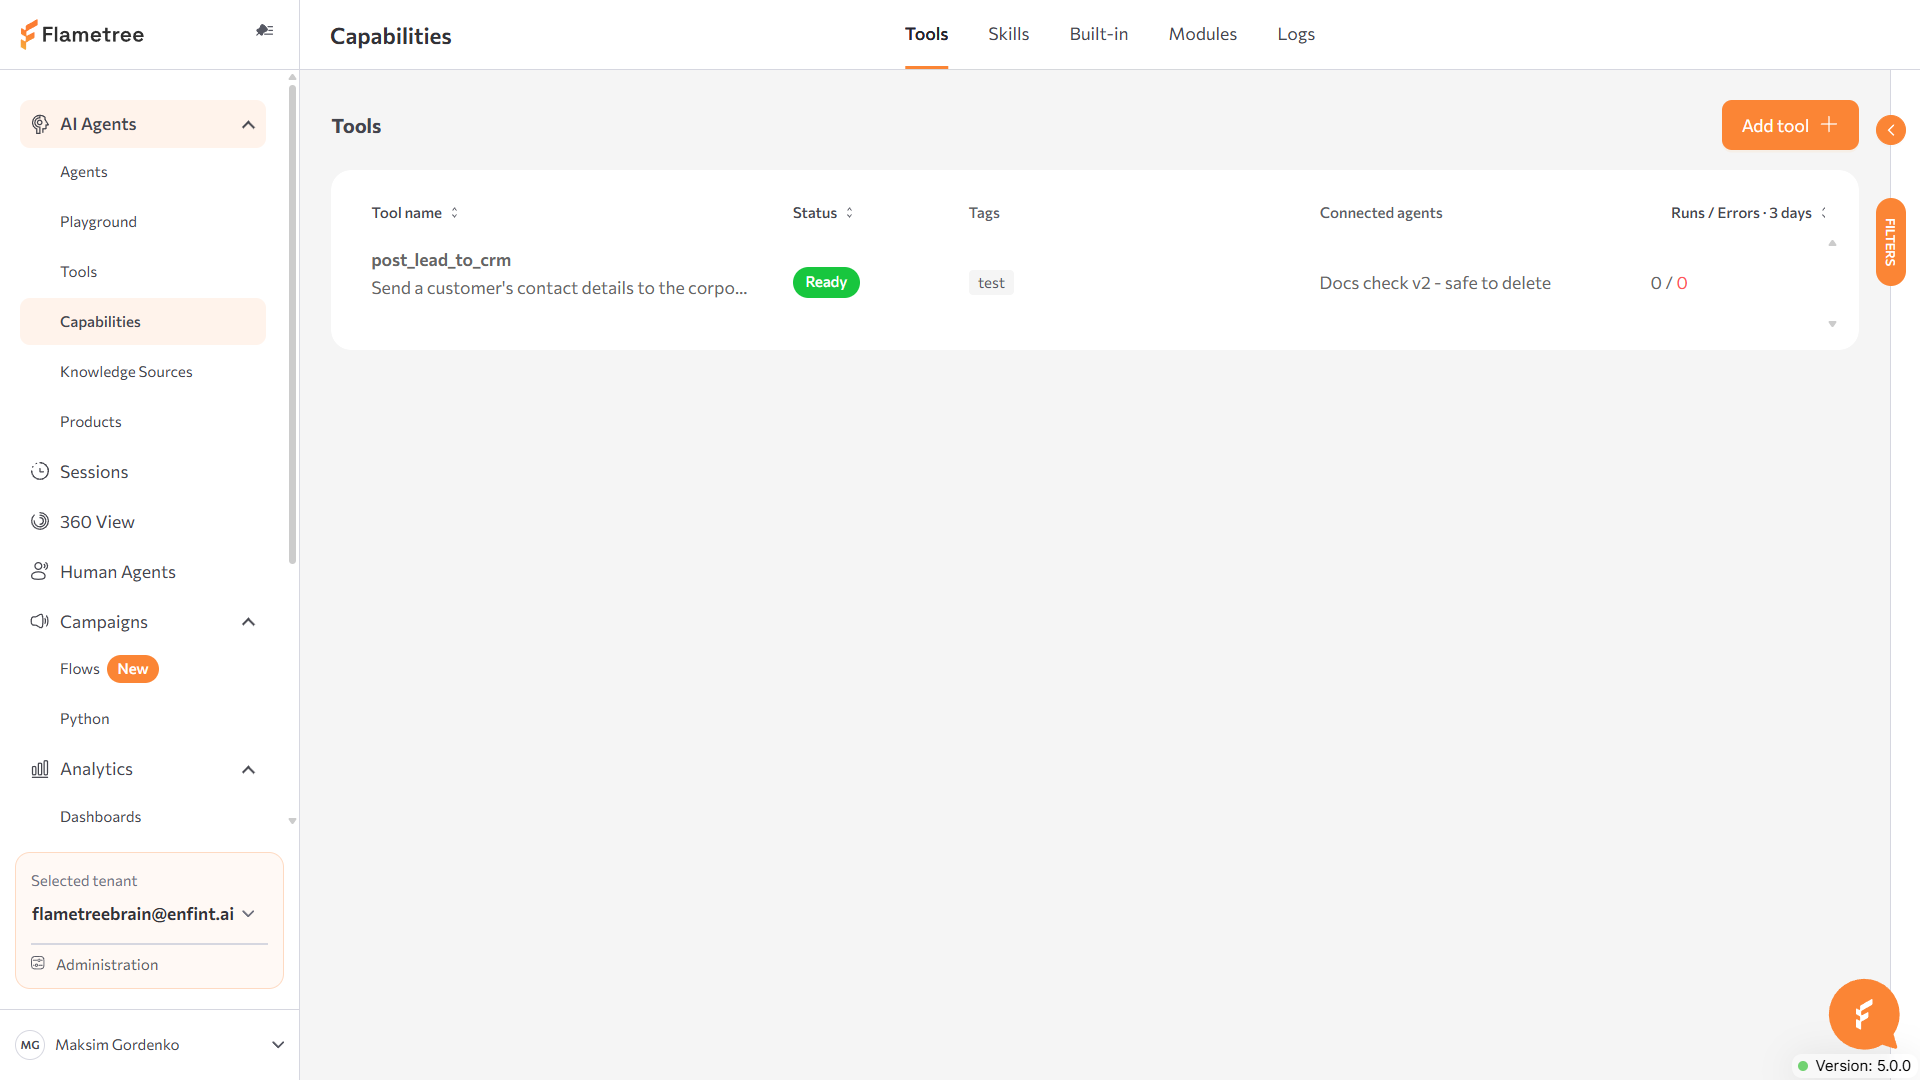
Capabilities has five tabs:
- Tools — your tenant's custom tools, one row per tool.
- Skills — a set of tools plus instructions, made available to an agent as one unit at points you configure, instead of being called individually. See Skills below.
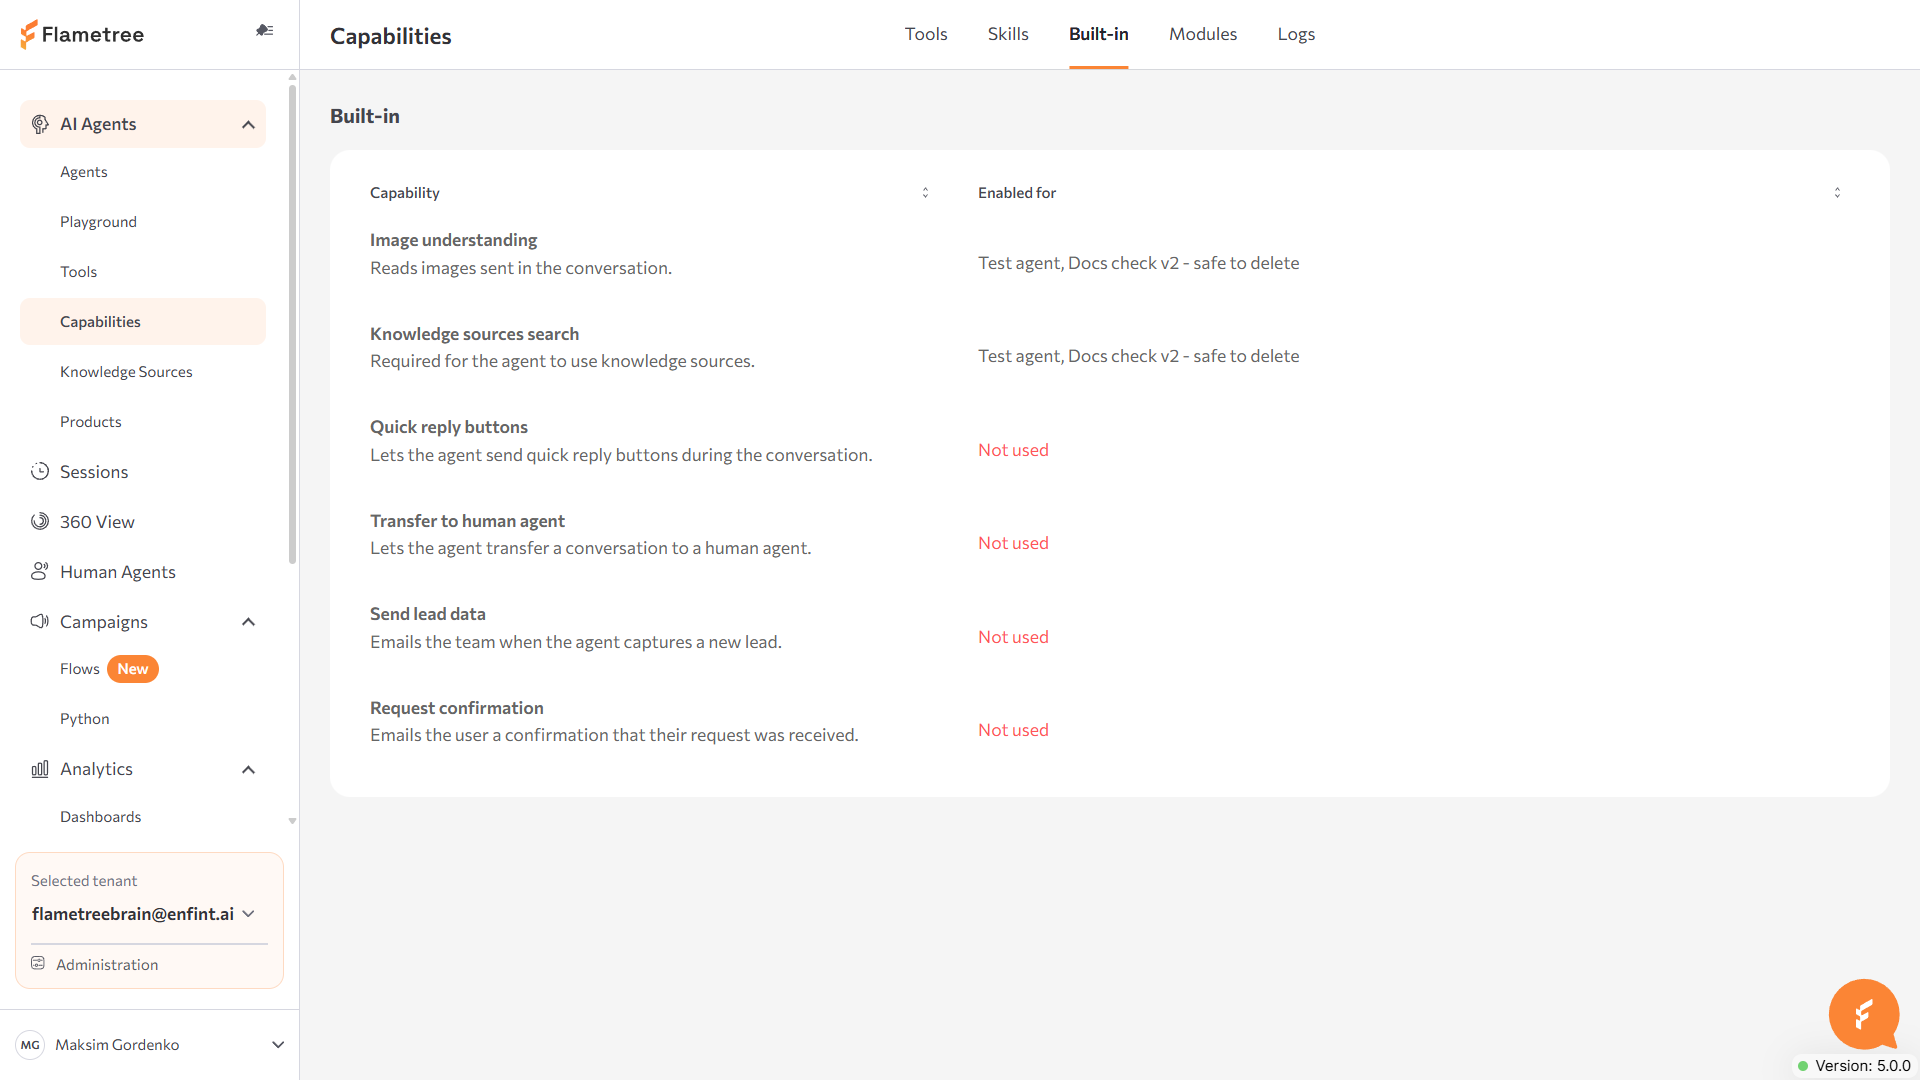
- Built-in — the platform's built-in capabilities (for example, image understanding) and which agents use each one.
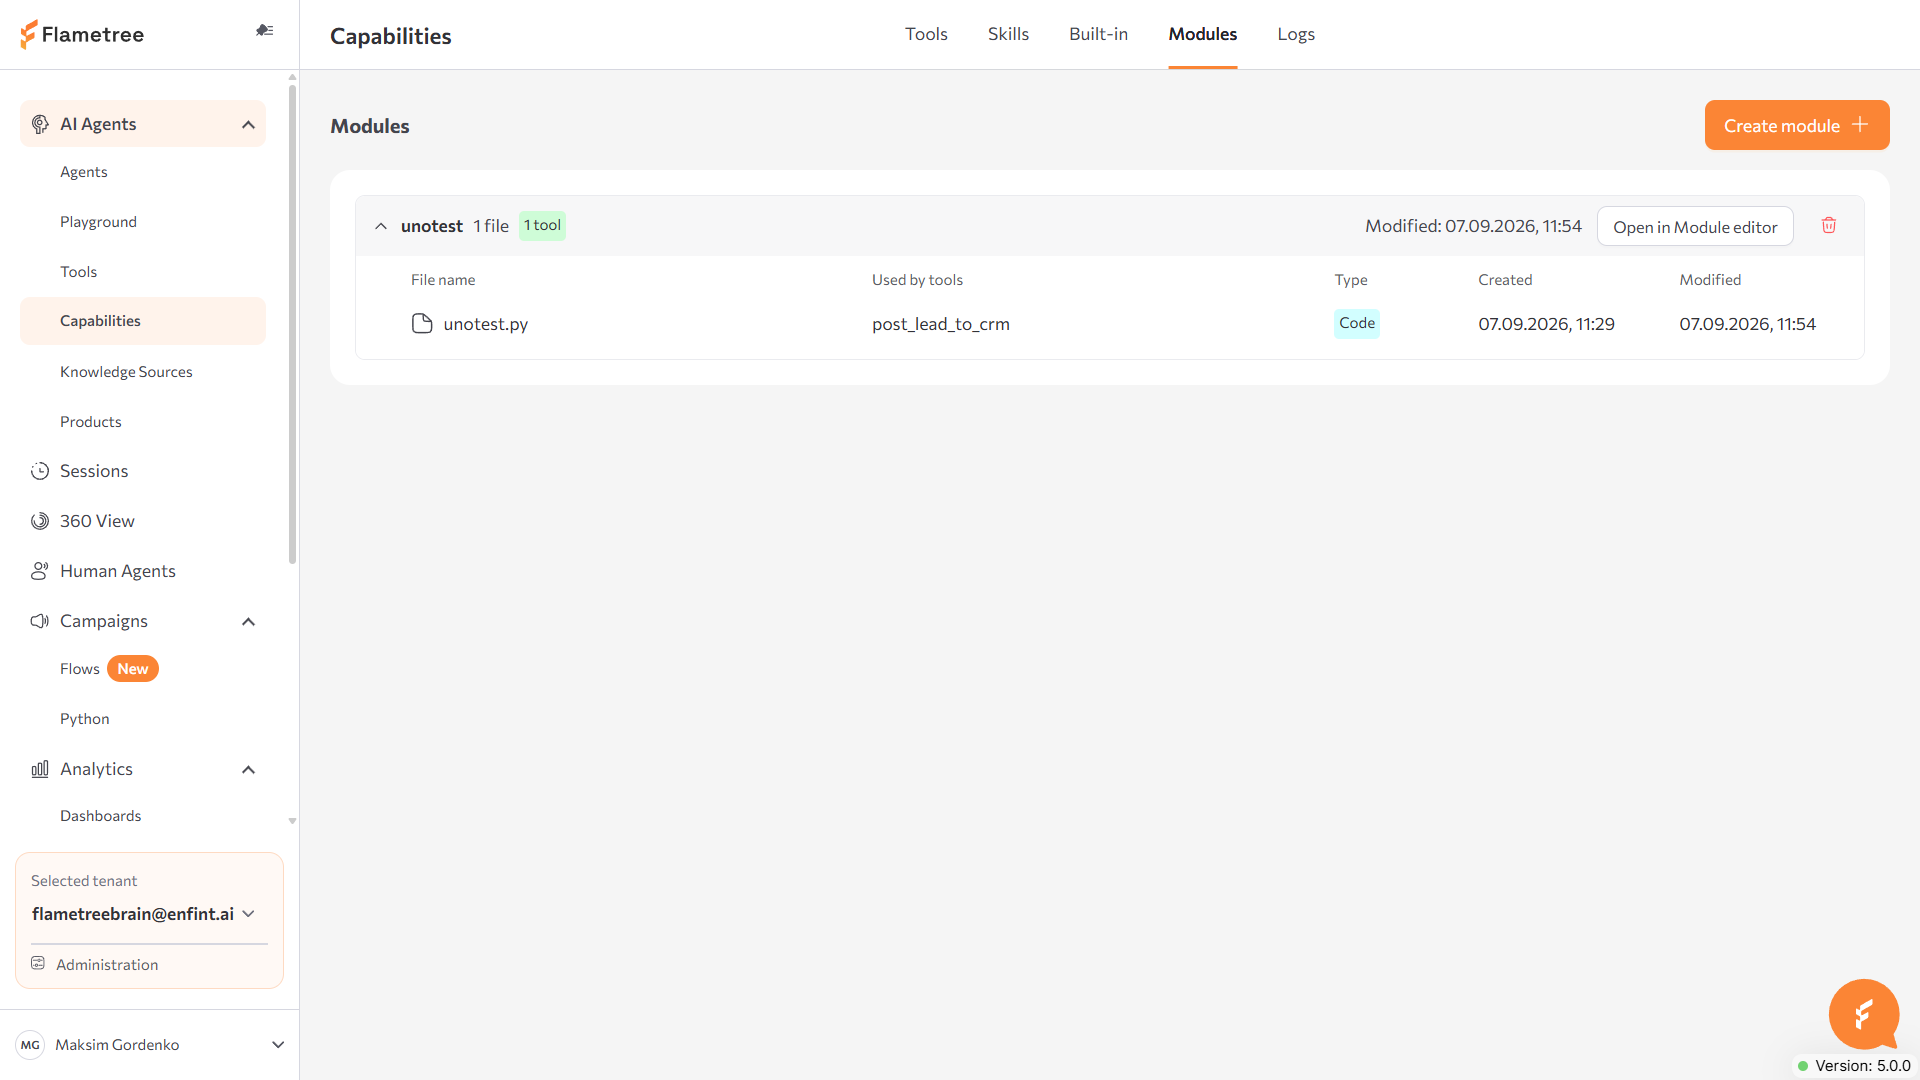
- Modules — the Python code a tool is built from: uploaded or pasted files, third-party requirements, and dependencies between modules.
- Logs — a history of tool calls, with filters and per-run detail.
Create a tool
-
On the Tools tab, click Add tool (or, on the Modules tab, Create module). Either opens the same tool builder.
-
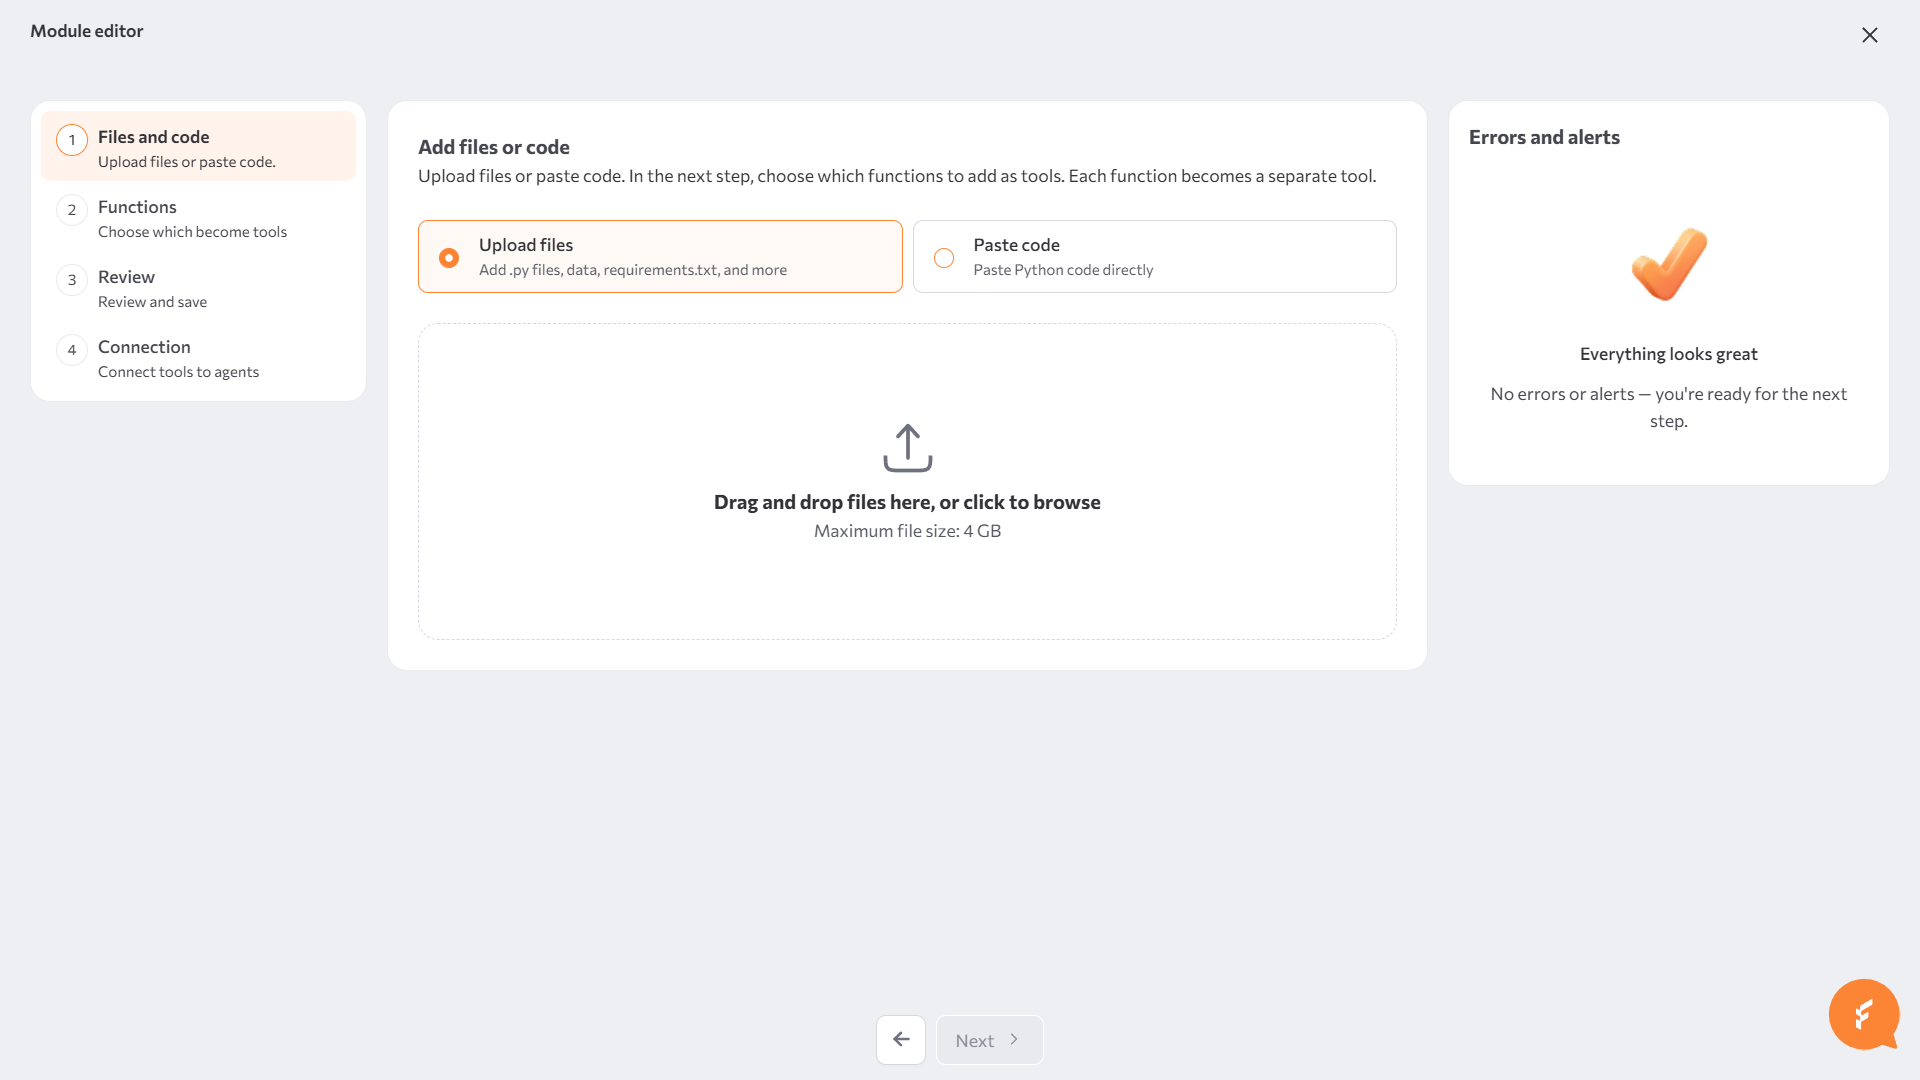
Add files or code — choose Upload files (
.pyand.txt, for example arequirements.txt) or Paste code (enter a File name and paste Python directly). Click Next.The parser reads plain functions — no decorator or base class required:
import os
import requests
from typing import Optional

def post_lead_to_crm(client_name: str, client_email: str, offering: Optional[str] = None) -> str:
    """Send a customer's contact details to the corporate CRM.

    Args:
        client_name: Full name of the client.
        client_email: Email address of the client.
        offering: The product or service the client is interested in, if known.
    """
    api_key = os.environ["CRM_API_KEY"]
    response = requests.post(
        "https://crm.example.com/api/leads",
        json={"name": client_name, "email": client_email, "offering": offering},
        headers={"Authorization": f"Bearer {api_key}"},
    )
    response.raise_for_status()
return "Lead created in the CRM."- The function's docstring becomes the tool's description; a Google-style Args: section fills in each parameter's description.
- Type hints set each parameter's type. Use
Optional[...]for an optional parameter — the newerstr | Nonesyntax isn't recognized. - A key read from
os.environ(likeCRM_API_KEYabove) is picked up as an environment variable automatically, and marked Secret by default when its name looks like one (TOKEN,KEY,SECRET,PASSWORD,CREDENTIAL). - A function whose name starts with
_is treated as a private helper, not a tool candidate.
-
Functions — the code is parsed into a module: a named, reusable package of files that one or more tools are built from.
- Set the Module name.
- Every Python function found in the code appears in the Functions list. Click Create tool on a function to configure it (see Configure a tool below) — the function's badge changes from Function to Tool once configured. You don't have to turn every function into a tool.
- Under Module files, Requirements, and Dependencies, add more files, paste additional requirements, or link other modules in your tenant that this one depends on.
- An Errors and alerts panel on the right — present from the first step onward — flags problems in the code as you go; for example an import that isn't in your requirements, or an environment variable your code reads but never declares.
-
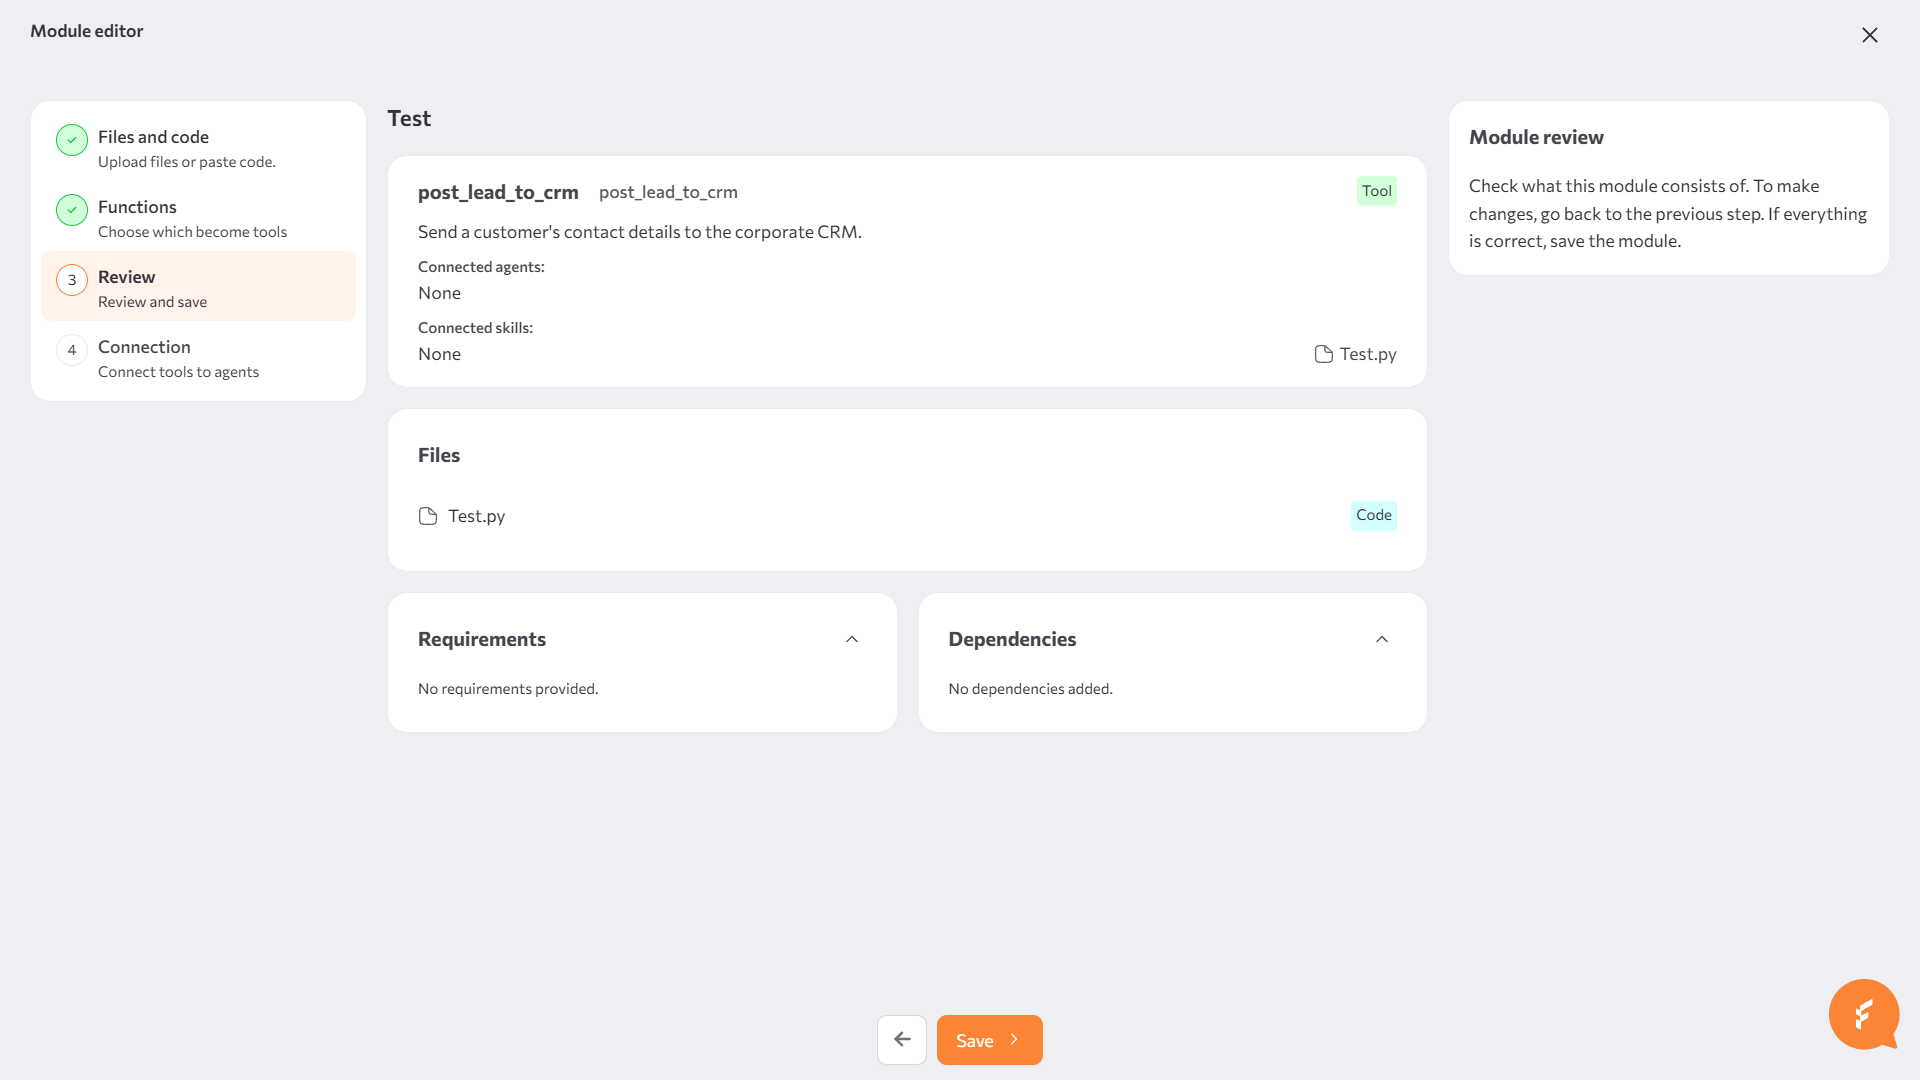
Review — check the tools you configured (name, function, description, connected agents, connected skills) and the module's files, requirements, and dependencies, then save. Saving creates the module and its tools.
-
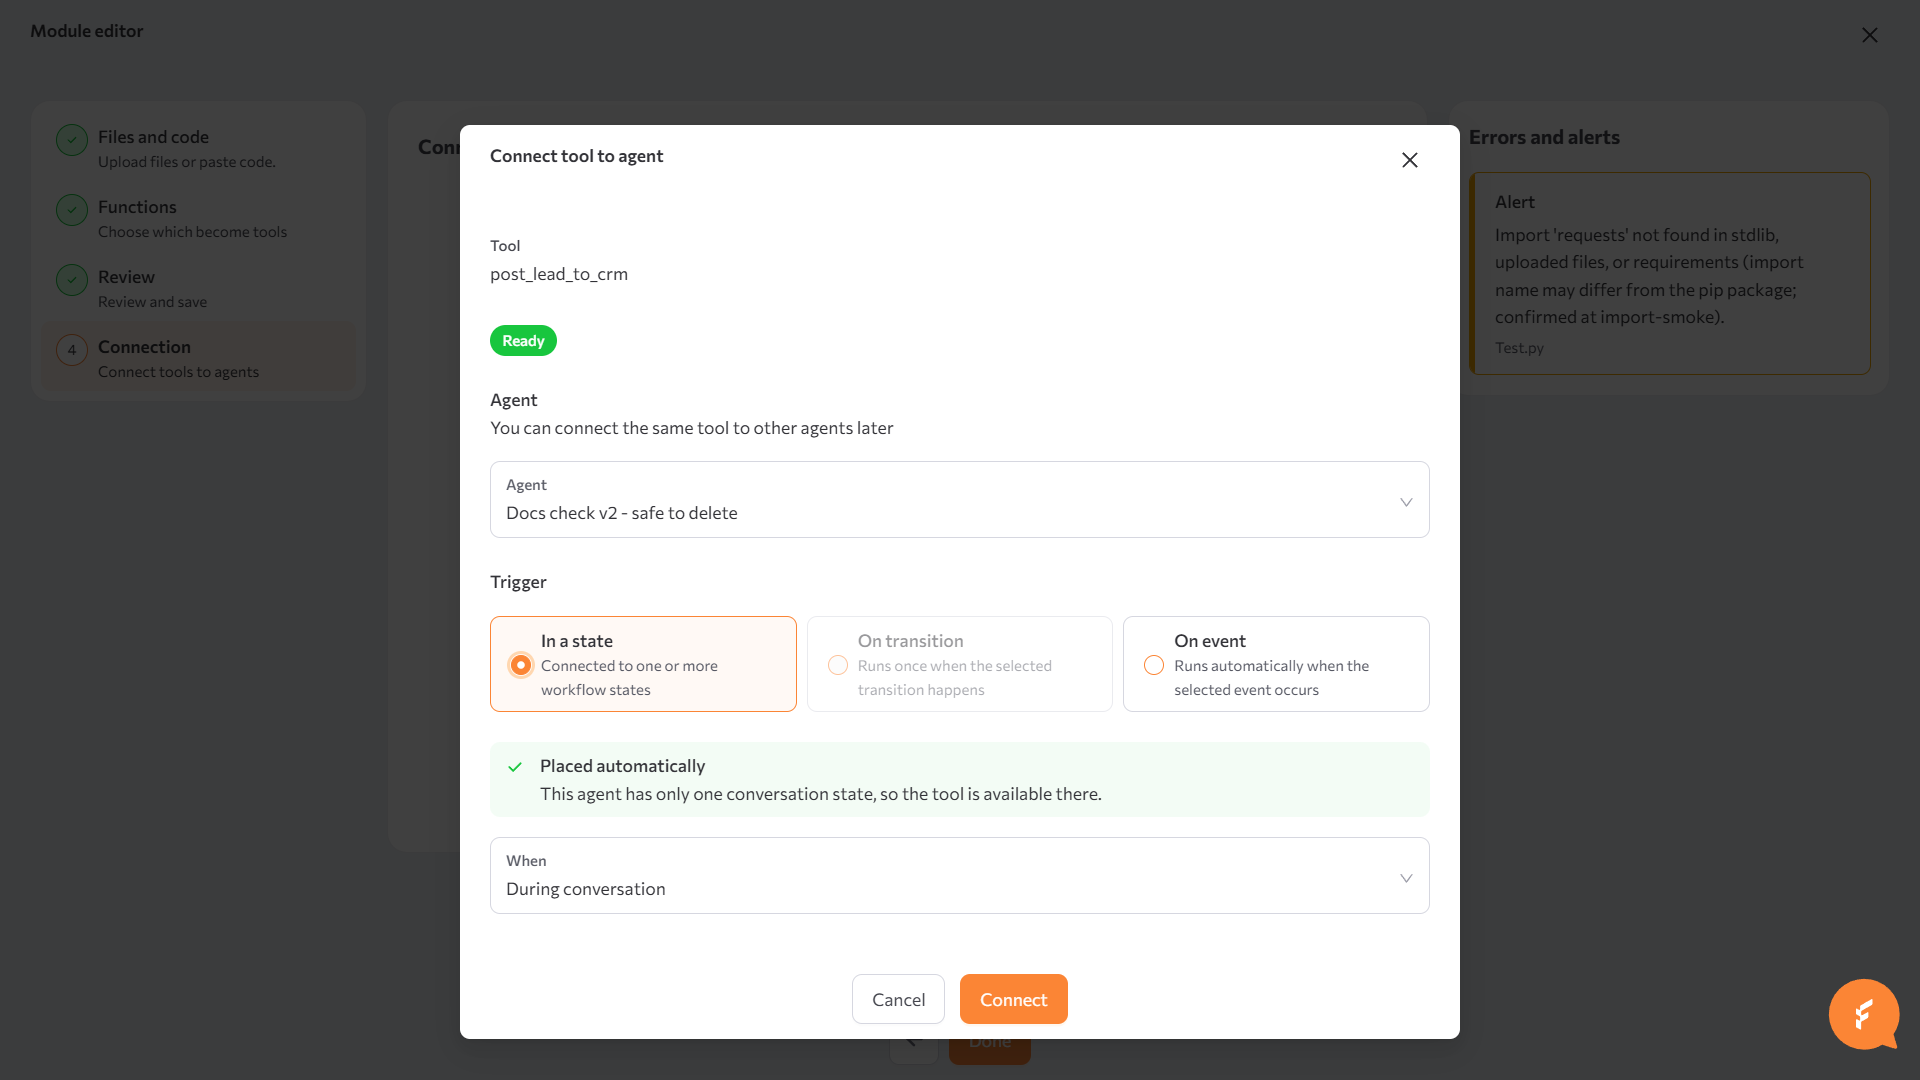
Connection (optional) — connect the new tools to an agent now, or skip this step and connect them later. See Connect a tool to an agent.
Configure a tool
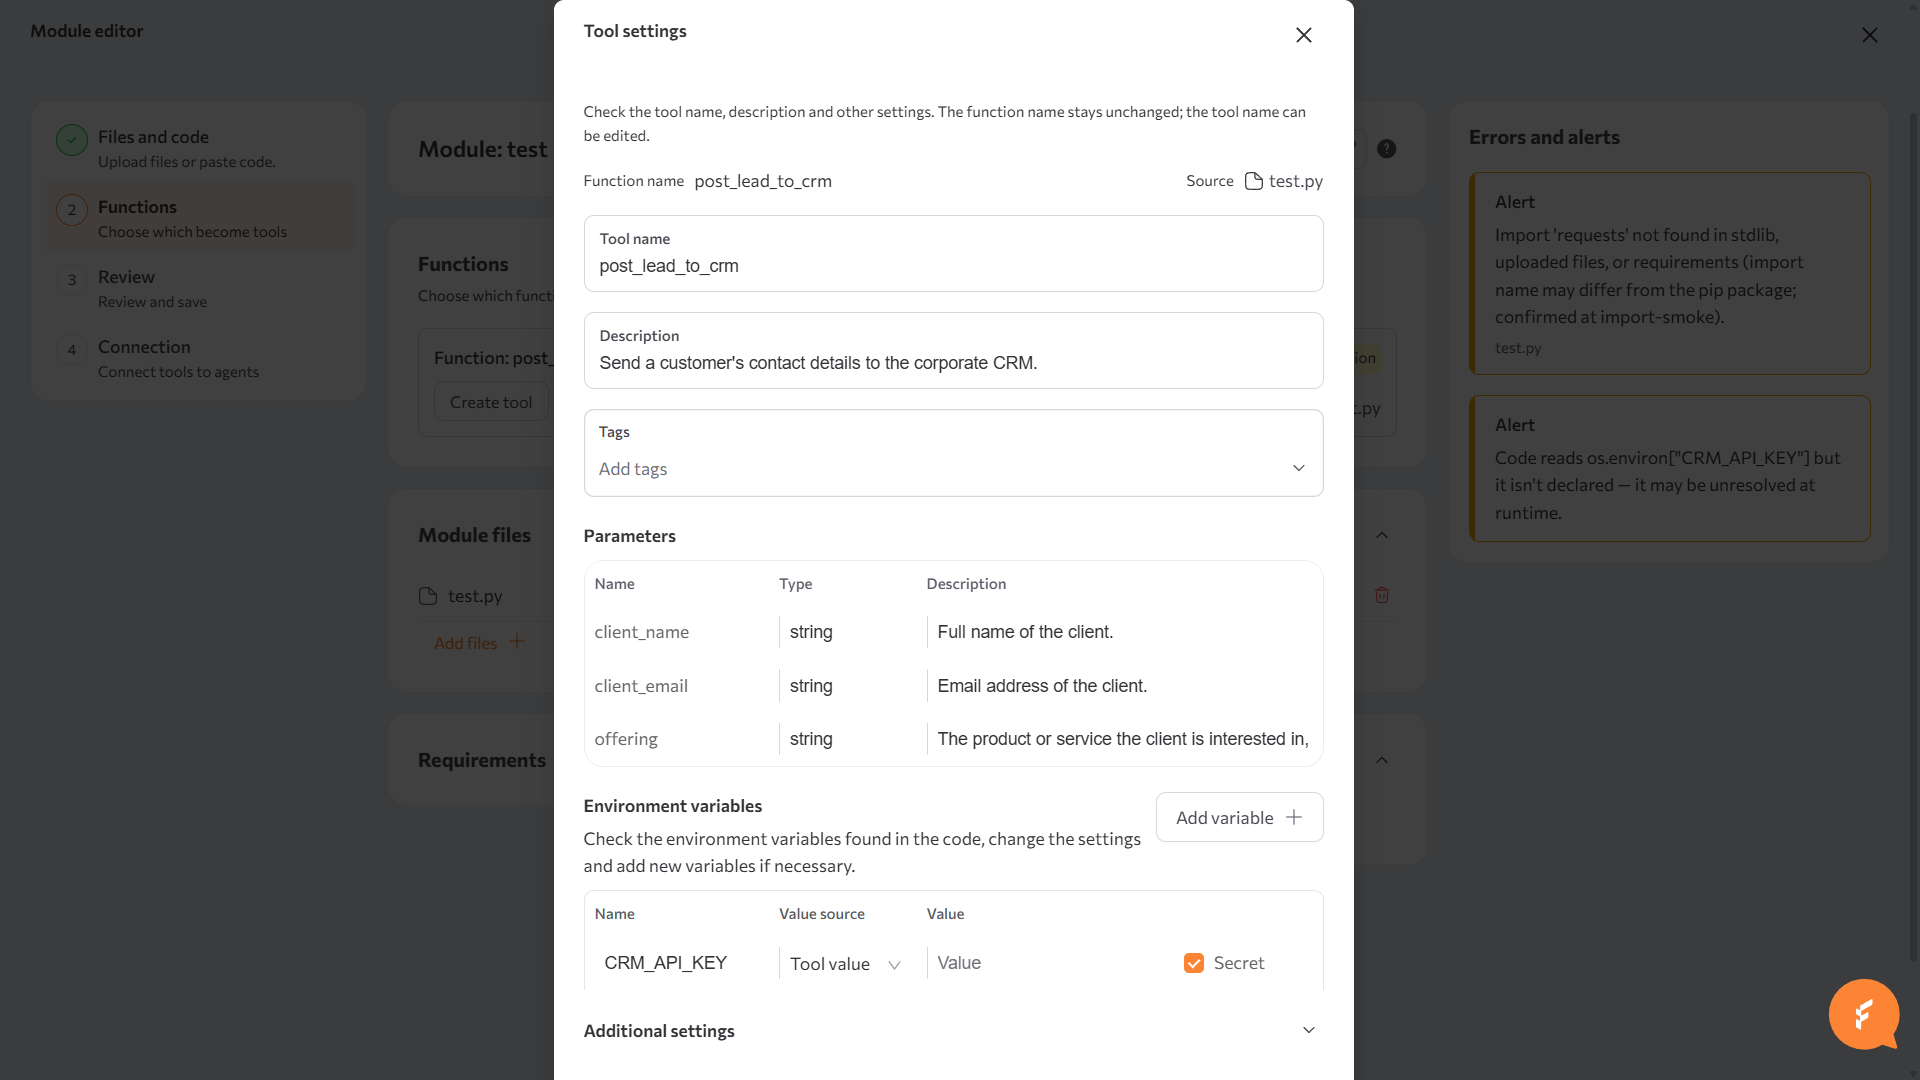
Tool settings opens when you click Create tool (or Settings, once configured) on a function. It shows the read-only Function name and its Source file, then:
| Field | Description |
|---|---|
| Tool name | Defaults to the function name, but can be edited separately — the function itself stays unchanged. Shown to the agent's model as the tool it can call. |
| Description | What the tool does — the model uses this to decide when to call it. Filled in from the function's docstring. |
| Tags | Pick existing tags or type a new one to create it. |
| Parameters | One row per function parameter: Name, Type, and an editable Description the model reads. A parameter the platform fills in automatically instead of the model — by name, or any *args/**kwargs parameter — shows as a read-only System parameter row instead; see System parameters below. |
| Environment variables | Values the tool's code needs at runtime. Add a variable's Name and a Value source: Tool value (enter a Value here, optionally marked Secret) or Required on agent (supplied per agent instead of here). |
| Additional settings | Repeat limit — how many times the tool may run in a session. Allow duplicate calls — whether the same call (same parameters) can run more than once. |
System parameters
A system parameter is one the platform fills in itself at call time — the model never sees or fills it. A function parameter becomes a system parameter when its name matches one of the platform's reserved names (below), or when it's a *args or **kwargs parameter — those always show as system parameters, whatever you name them, and the Parameters table displays them as the literal strings *args / **kwargs rather than a real name.
The reserved names, what each one holds, and when it's actually populated (some are always present; others depend on how the tool was called):
| Parameter | What it holds | Available |
|---|---|---|
ctx | The invocation context — the session and global state for this call, as a single object. | Always |
heap | A shared scratch dict for passing data between tool calls in the same session. | Always |
stack | The session's UI/answer stack, for tools that push a structured item back to the conversation (for example, a prompt asking the user to confirm something). | Tools an agent calls directly; not for event-triggered tools |
system_parameters | Tenant-level system parameters, for example the tenant ID. | Always |
conversation_memory | The conversation's turn and record history. | Always |
flags_config | Session-level flags, for example whether this is the first turn of the session. | Always |
flow_config | The full configuration for the session's current flow. | Always |
turn_kind | "regular" or "proactive" — whether this turn is a normal reply or an agent-initiated follow-up. | Always |
agent_config | The calling agent's own configuration. | Tools an agent calls directly |
tools_vdb | The tools vector database, for a tool that searches across other tools. | Only the built-in tool-search tool; empty for every other tool |
knowledge_vdb | The knowledge sources vector database. | Tools an agent calls directly |
environment_json | The agent's environment variables, as a JSON string. | Tools an agent calls directly; an empty object otherwise |
available_skills_dict | The tools currently available to the calling agent, by name. | Tools an agent calls directly |
scratchpad | The calling agent's scratchpad memory. | Tools an agent calls directly |
agent_name | The calling agent's name. | Tools an agent calls directly |
automatic_operation | Whether the agent is running in automatic (non-interactive) mode. | Tools an agent calls directly |
tool_call_id | The model's ID for this specific tool call. | Tools an agent calls directly |
tool_call_type | The type of call — "function" by default. | Tools an agent calls directly |
__sys_parameters | Same value as system_parameters. | Always |
__global_heap | Same value as heap. | Always |
__flow_config | Same value as flow_config. | Always |
__statemachine | The session's state machine, for a tool built for a specific workflow state. | Always present; only populated when the session's flow uses a state machine |
durable_storage | The session's persistent storage, for data that must survive across turns. | Always |
__env_parameters | The agent's environment variables, as a dict. | Whenever the session has a flow configuration |
__global_continuous_heap | A heap that persists for the whole session, not just the current turn. | Whenever the session has a flow configuration |
__event_manager | The session's event manager, for a tool that needs to raise or react to platform events. | Whenever the session has a flow configuration |
__chat_history | The conversation's message history, as a list. | Whenever the session has a flow configuration |
__data_model | The conversation result fields currently defined for the session. | Whenever the session has a flow configuration |
_invocation_context | Reserved by the platform. | Not currently populated with a value tool code can rely on |
"Always" means the platform passes a value on every call, including tools that run automatically on a session event rather than being called by an agent — though for some of those parameters the value is empty until something in the session has set it (for example, __statemachine is empty unless the flow uses a state machine).
Manage tools
The Tools tab lists every tool in your tenant: name, status, tags, connected agents (up to three names, with a count for more), and a Runs / Errors count for a rolling window (3 days by default). Use the Filters panel to narrow the list by tool name, tags, connected agents, usage count, or creation/edit date.
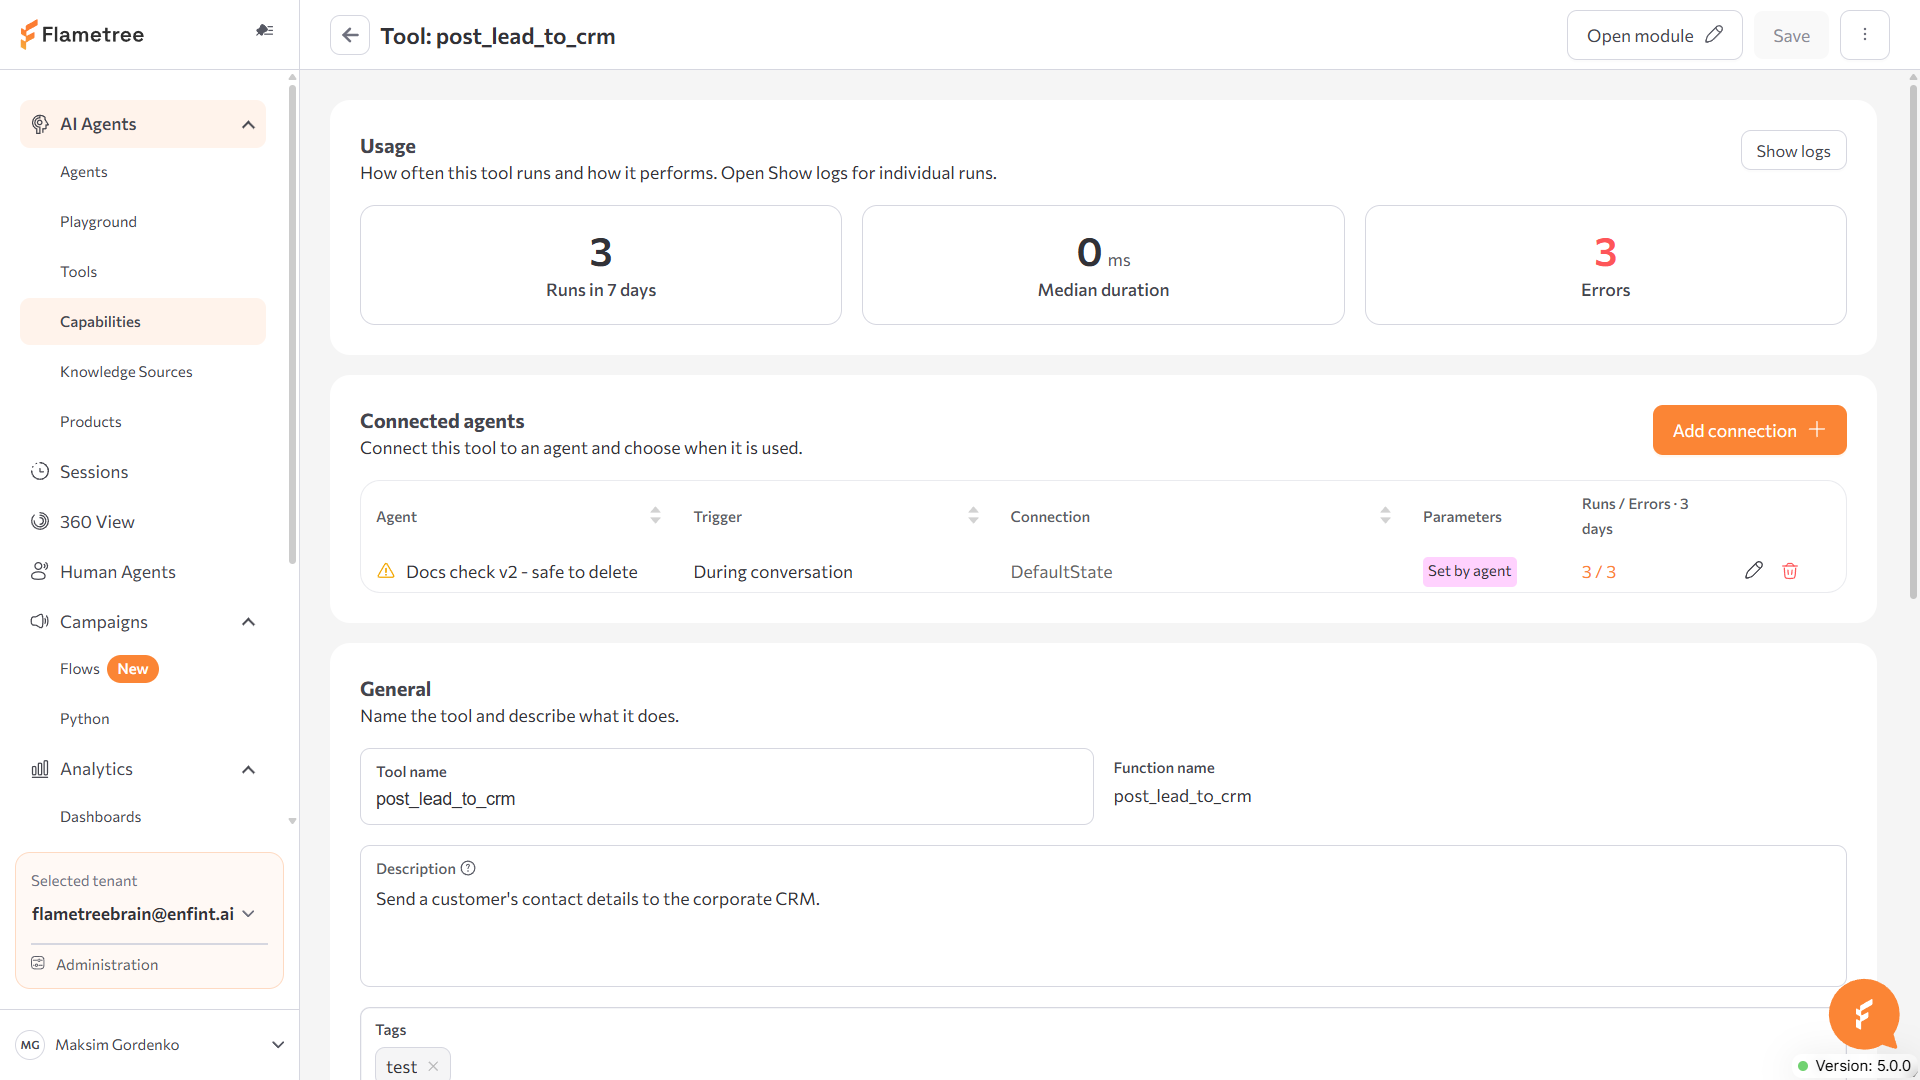
Click a tool to open its detail page:
- Usage — run counts and median duration for a rolling window (3 days by default), and error count, with a Show logs link into the Logs tab filtered to this tool.
- Connected agents — every agent the tool is connected to, with the connection's trigger, the workflow state it's connected in, how its parameters are set, and recent runs/errors. Add connection opens the same connect flow described in Connect a tool to an agent; each row's menu has Edit and Disconnect.
- The same fields as Configure a tool — General (tool name, function name, description, tags), Parameters, Environment variables, Additional settings — editable after creation.
Connect a tool to an agent
Connecting depends on which editor the agent uses:
- Agents on the new workflow editor — open the agent, go to its Capabilities tab (or a state, transition, or event panel in its workflow), and click Connect. Choose the agent, then the connection's Trigger: In a state (with a When setting, for example During conversation), On transition (runs once when the selected transition happens), or On event (runs automatically when the selected event occurs — session start, a new message from the person, or session end). For an agent whose workflow has only one state, the trigger is placed there automatically.
- Agents still on the classic editor — a tool built in Capabilities can't be connected to these agents. Attach a tool group instead, on the legacy Tools screen — see Tool Groups (Legacy).
Whichever editor an agent uses is decided by whether its workflow has been migrated to the new model — the agent page shows a banner offering to create a new-version copy when it hasn't. See Workflow tab for the canvas itself — states, transitions, and connecting tools and skills from there.
Skills
A skill bundles one or more tools with its own instructions, so an agent works with them as a unit instead of you exposing each tool on its own. Skills live in Capabilities > Skills, alongside Tools.
Create a skill
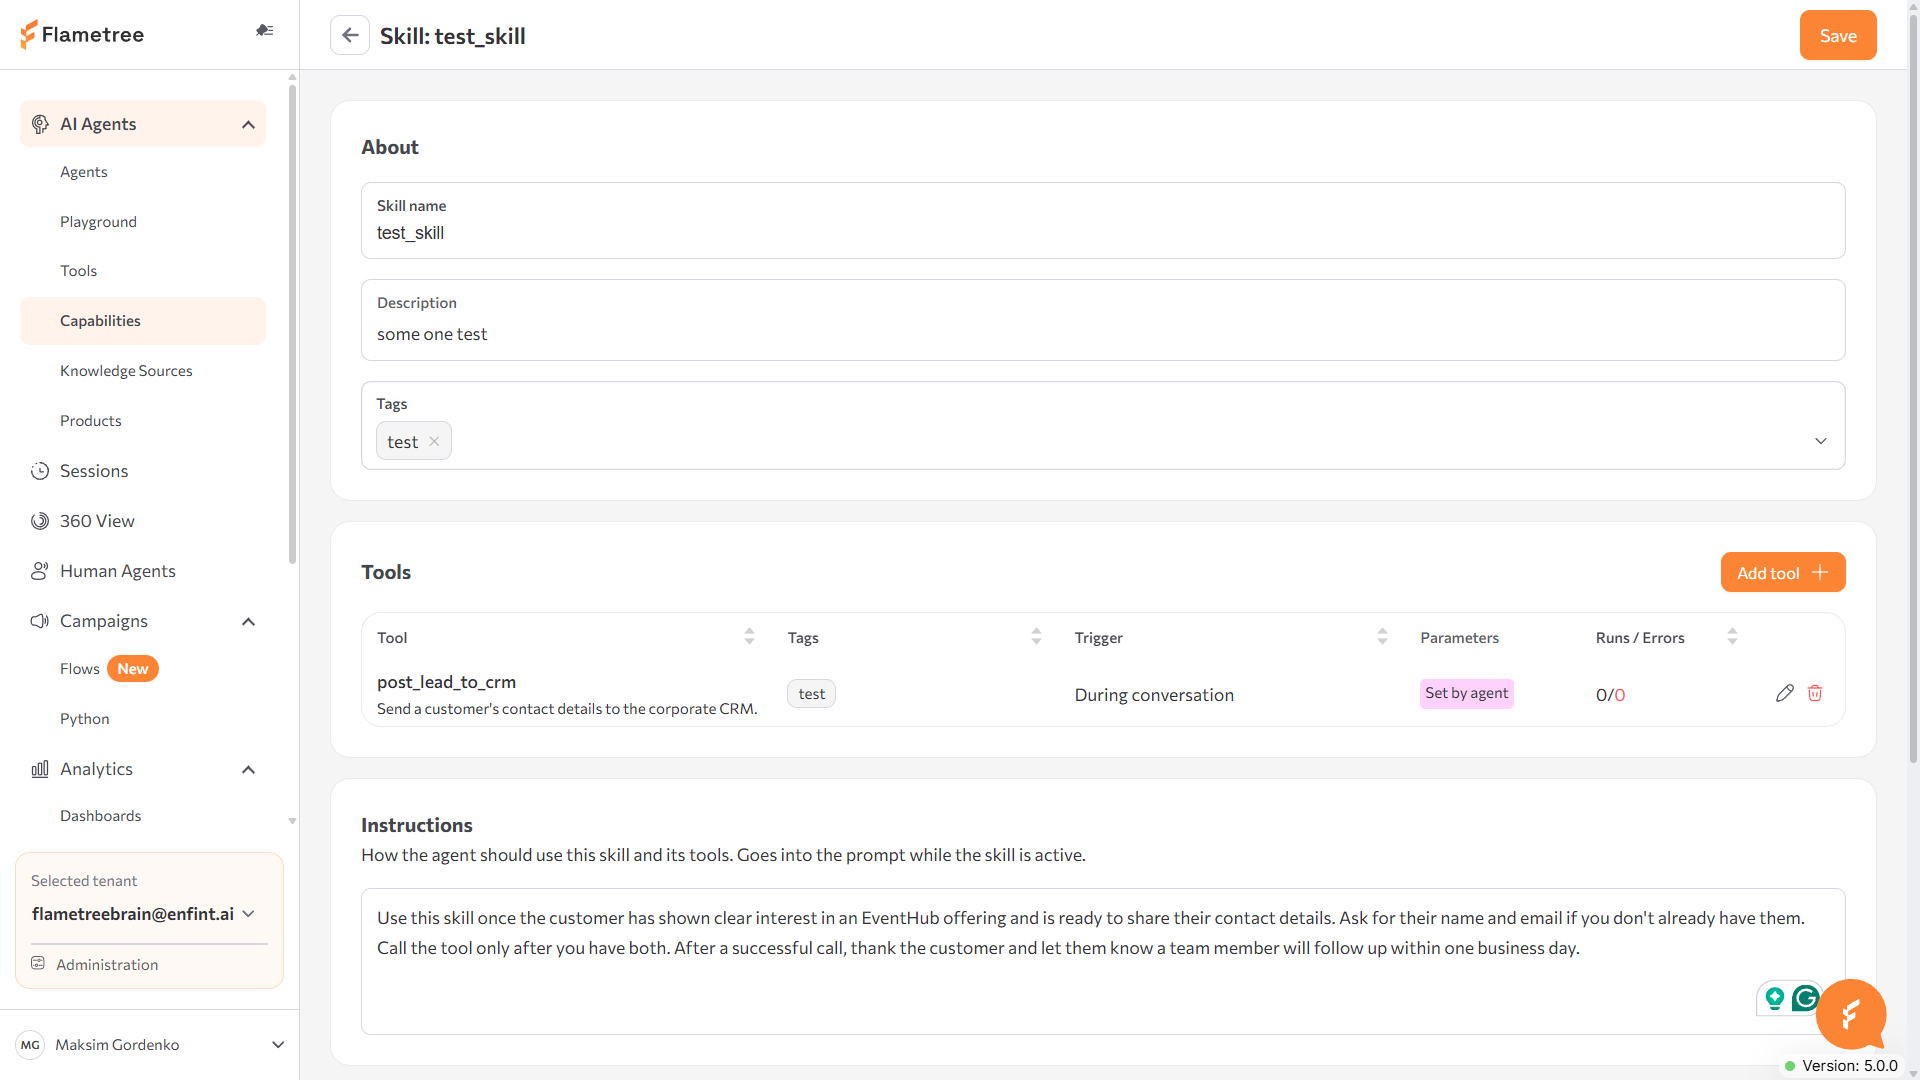
- On the Skills tab, click Add skill. This opens the skill's page — the same page you use to edit it afterward.
- About — set the Skill name (letters, numbers, and underscores only), a Description (the agent uses this to find the skill when access is set to By name or By search — see Connect a skill to an agent), and Tags.
- Tools — add the tools this skill uses, from your tenant's tools or the platform's built-in tools. Configure how each one runs (see below).
- Instructions — write what the skill adds to the agent's prompt while it's active: how to use the skill and its tools.
- Save. The portal blocks the save with This skill cannot be saved yet if a tool's setup fails validation.
Set how a tool in a skill runs
Each tool inside a skill has its own trigger, independent of the others, and a tool can combine both:
- In a state — During conversation (available any time the skill is active), On event: State entered, or On event: State exited.
- On event — the tool runs automatically when a chosen workflow event happens, regardless of state.
Manage skills
The Skills tab lists every skill in your tenant: name and description, tags, and the agents it's connected to. Click a row to open it.
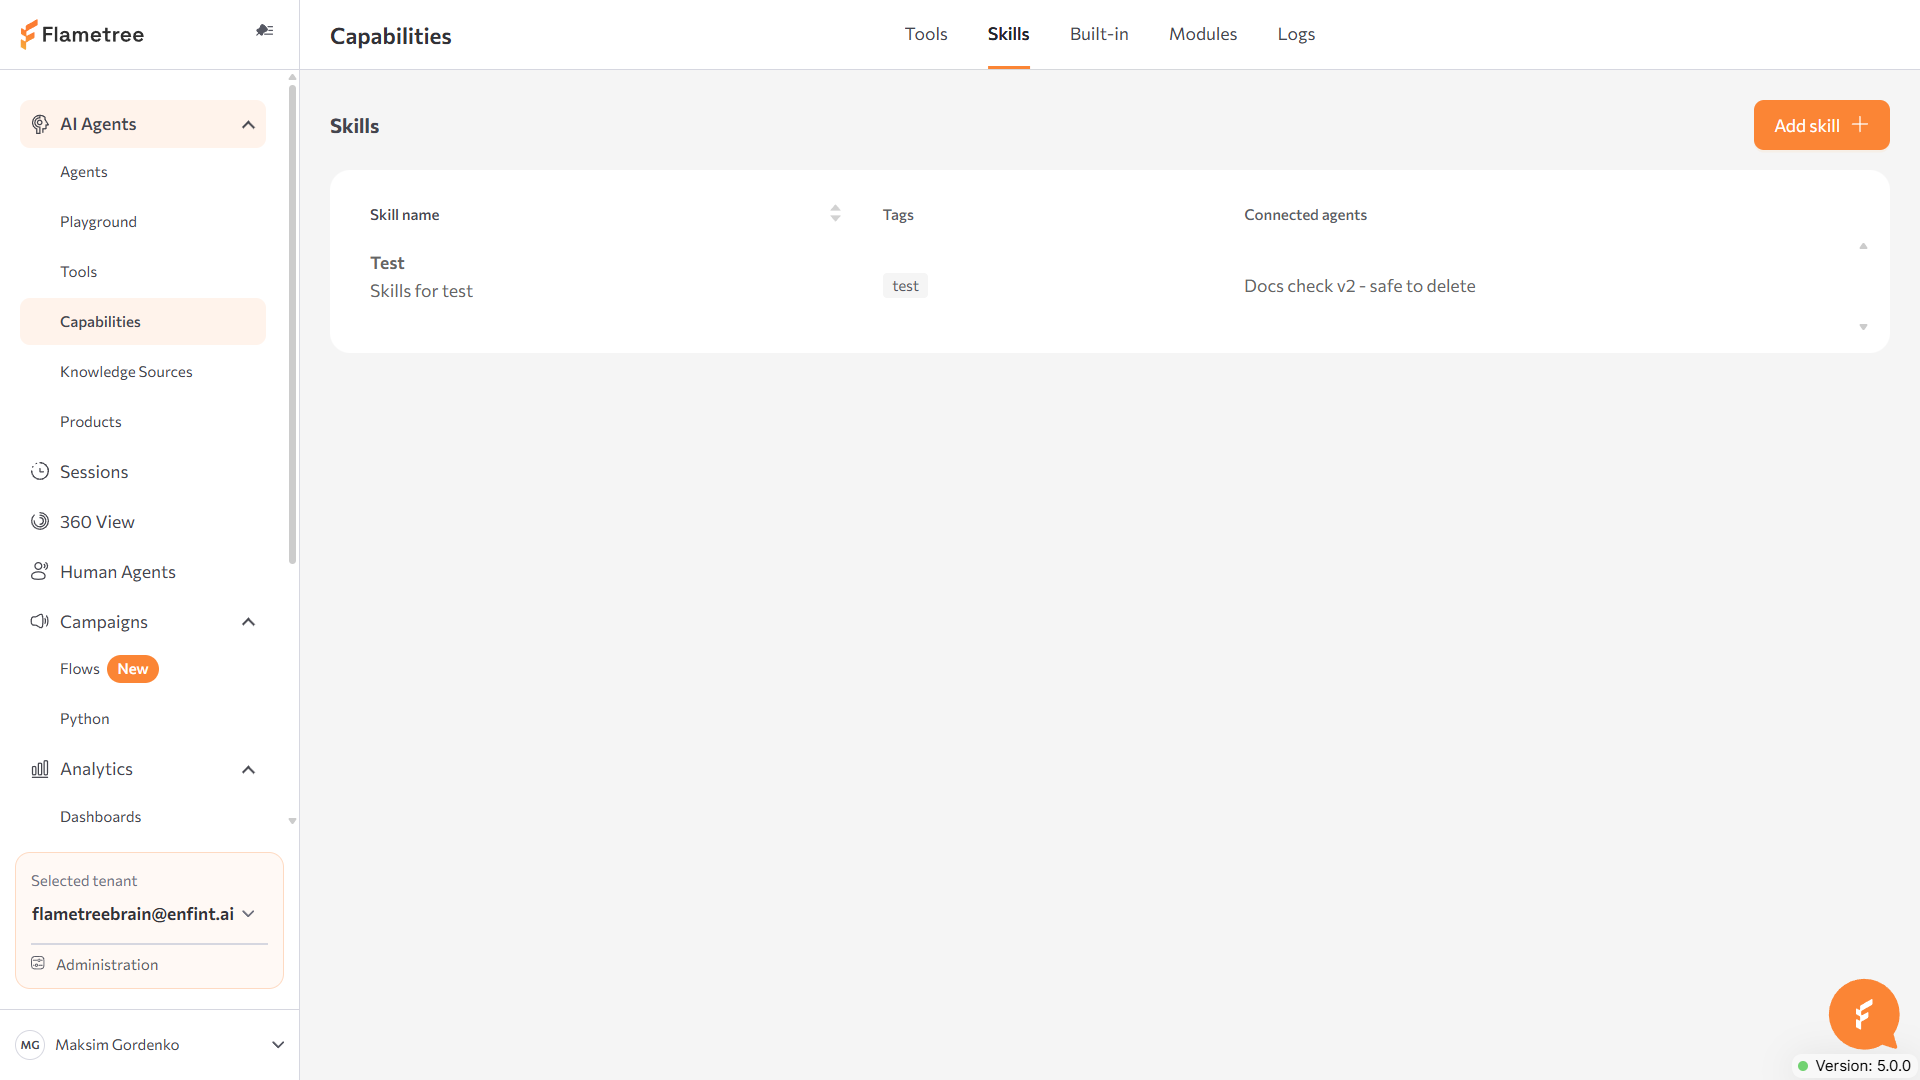
Opening a skill shows:
- About and Instructions — the same fields as when you created the skill, editable.
- Tools — every tool the skill uses, its trigger, whether its parameters are Set by agent or Set manually, and recent runs and errors.
- Connected agents — every agent the skill is connected to, how it's accessed, and which workflow states it applies to.
Deleting a skill checks its impact first: if it's connected anywhere, the portal offers Delete without restart or Delete and restart agents, and lists the affected agents.
Connect a skill to an agent
Connecting depends on which editor the agent uses, the same as tools:
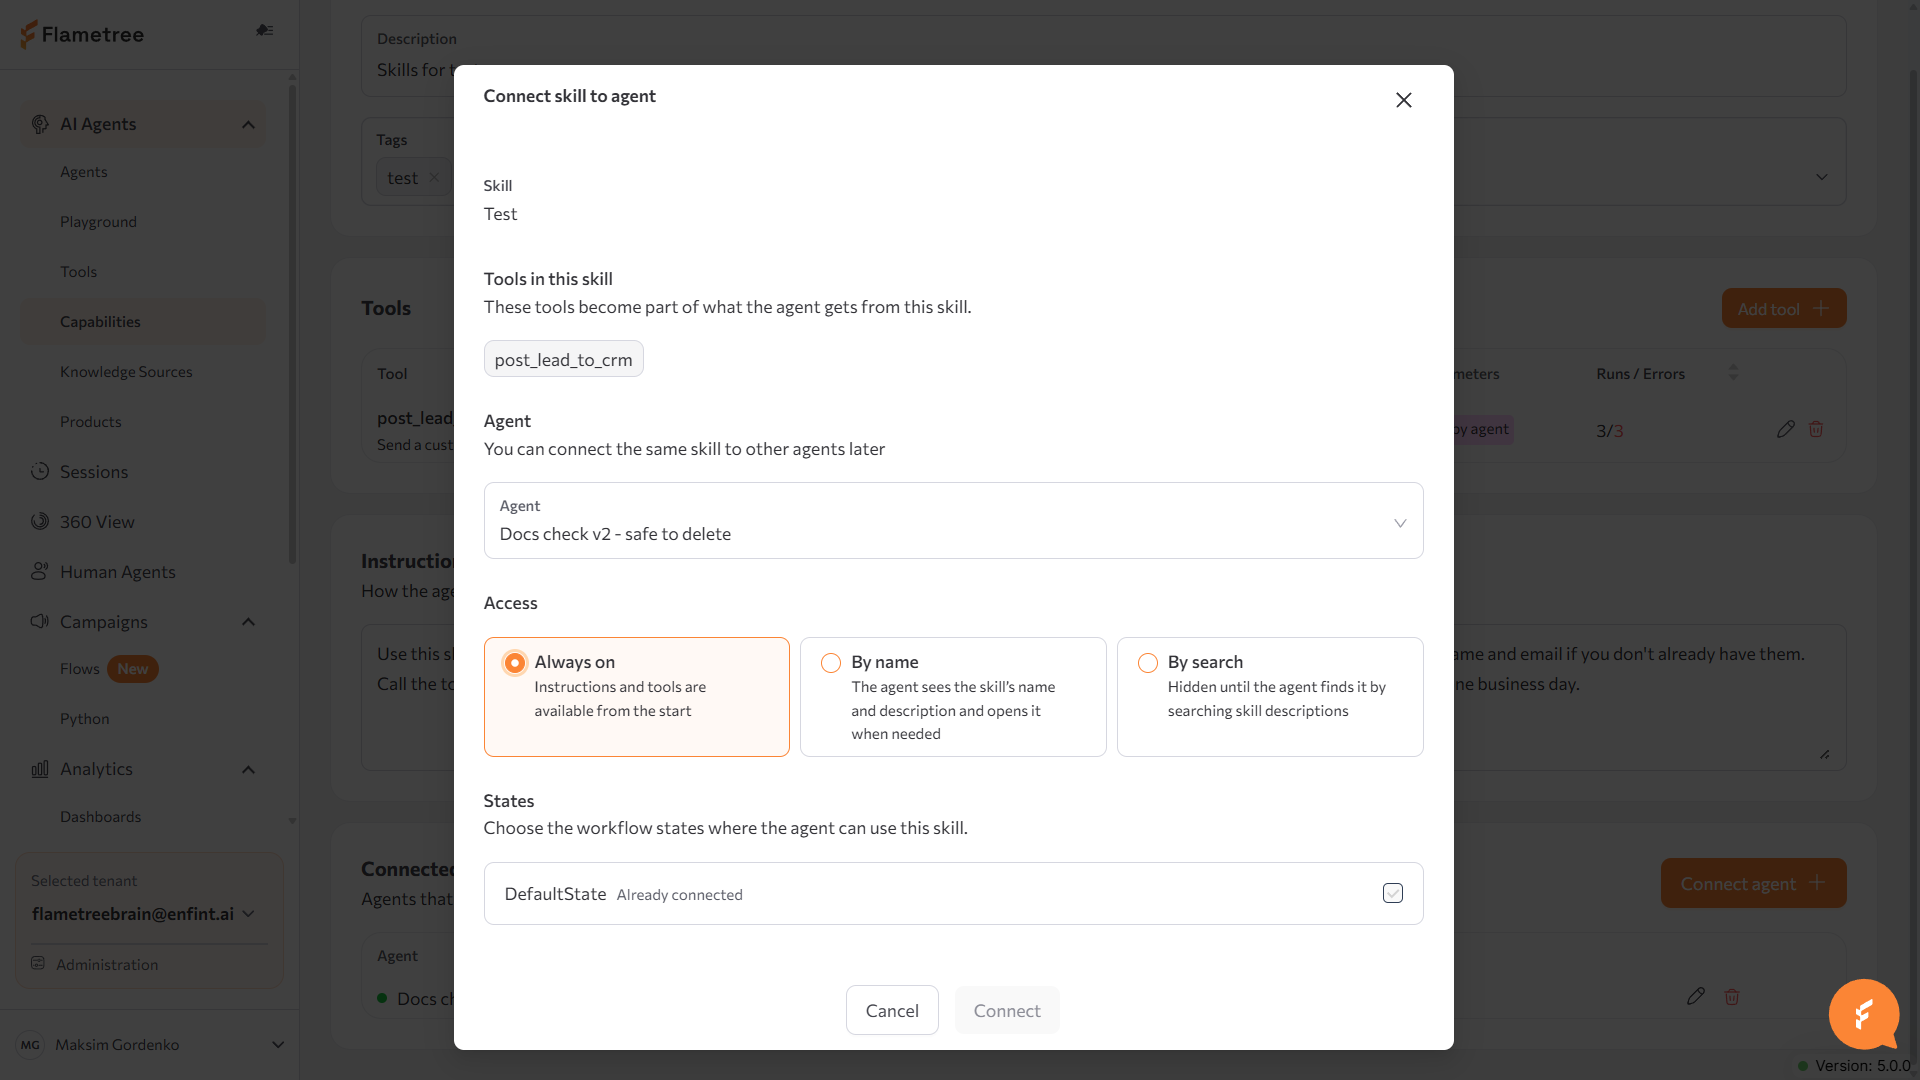
- Agents on the new workflow editor — open the skill's Connected agents section (or the agent's own Capabilities tab > Skills) and click Connect agent. Choose the agent, then how it can access the skill: Always on (instructions and tools available from the start), By name (the agent sees the skill's name and description and opens it when needed), or By search (hidden until the agent finds it by searching skill descriptions), then the workflow state(s) it applies to.
- Agents still on the classic editor — a skill built in Capabilities can't be connected to these agents. A tool group's YAML definition can describe its own skills instead — see Tool Groups (Legacy).
Browse the Built-in tab
The Built-in tab lists the platform's built-in capabilities (for example, image understanding) with a description of each and an Enabled for column listing the agents that use it, or Not used if none do yet.
Browse the Modules tab
The Modules tab lists your tenant's modules: name, file count, tool count, and last modified date. Click a module to expand its files — File name, Used by tools (which tools reference it), Type (Code or Data), and creation/edit dates. Open in Module editor reopens the tool builder for that module.
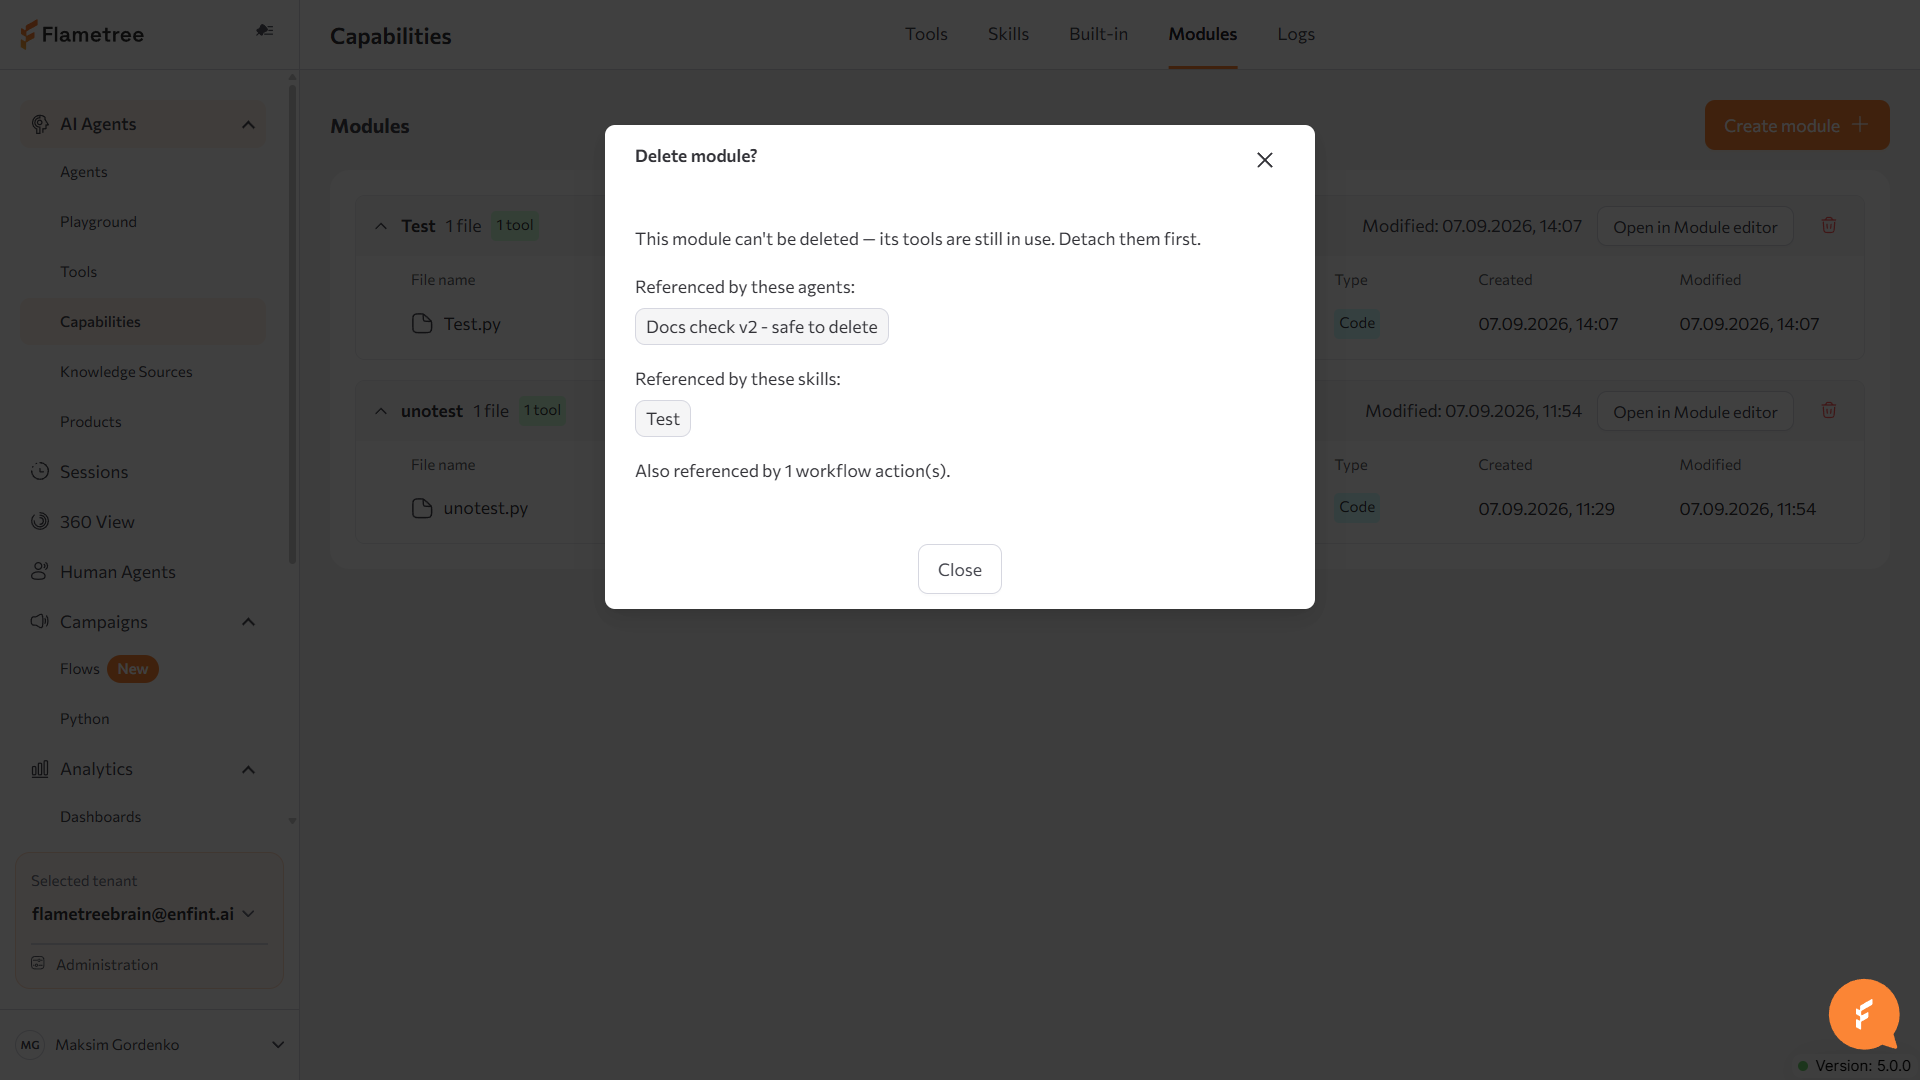
Deleting a module is blocked while its tools are still in use: the Delete module? dialog lists the agents, skills, and workflow actions referencing it and asks you to detach them first, instead of letting the delete go through.
Review tool calls in Logs
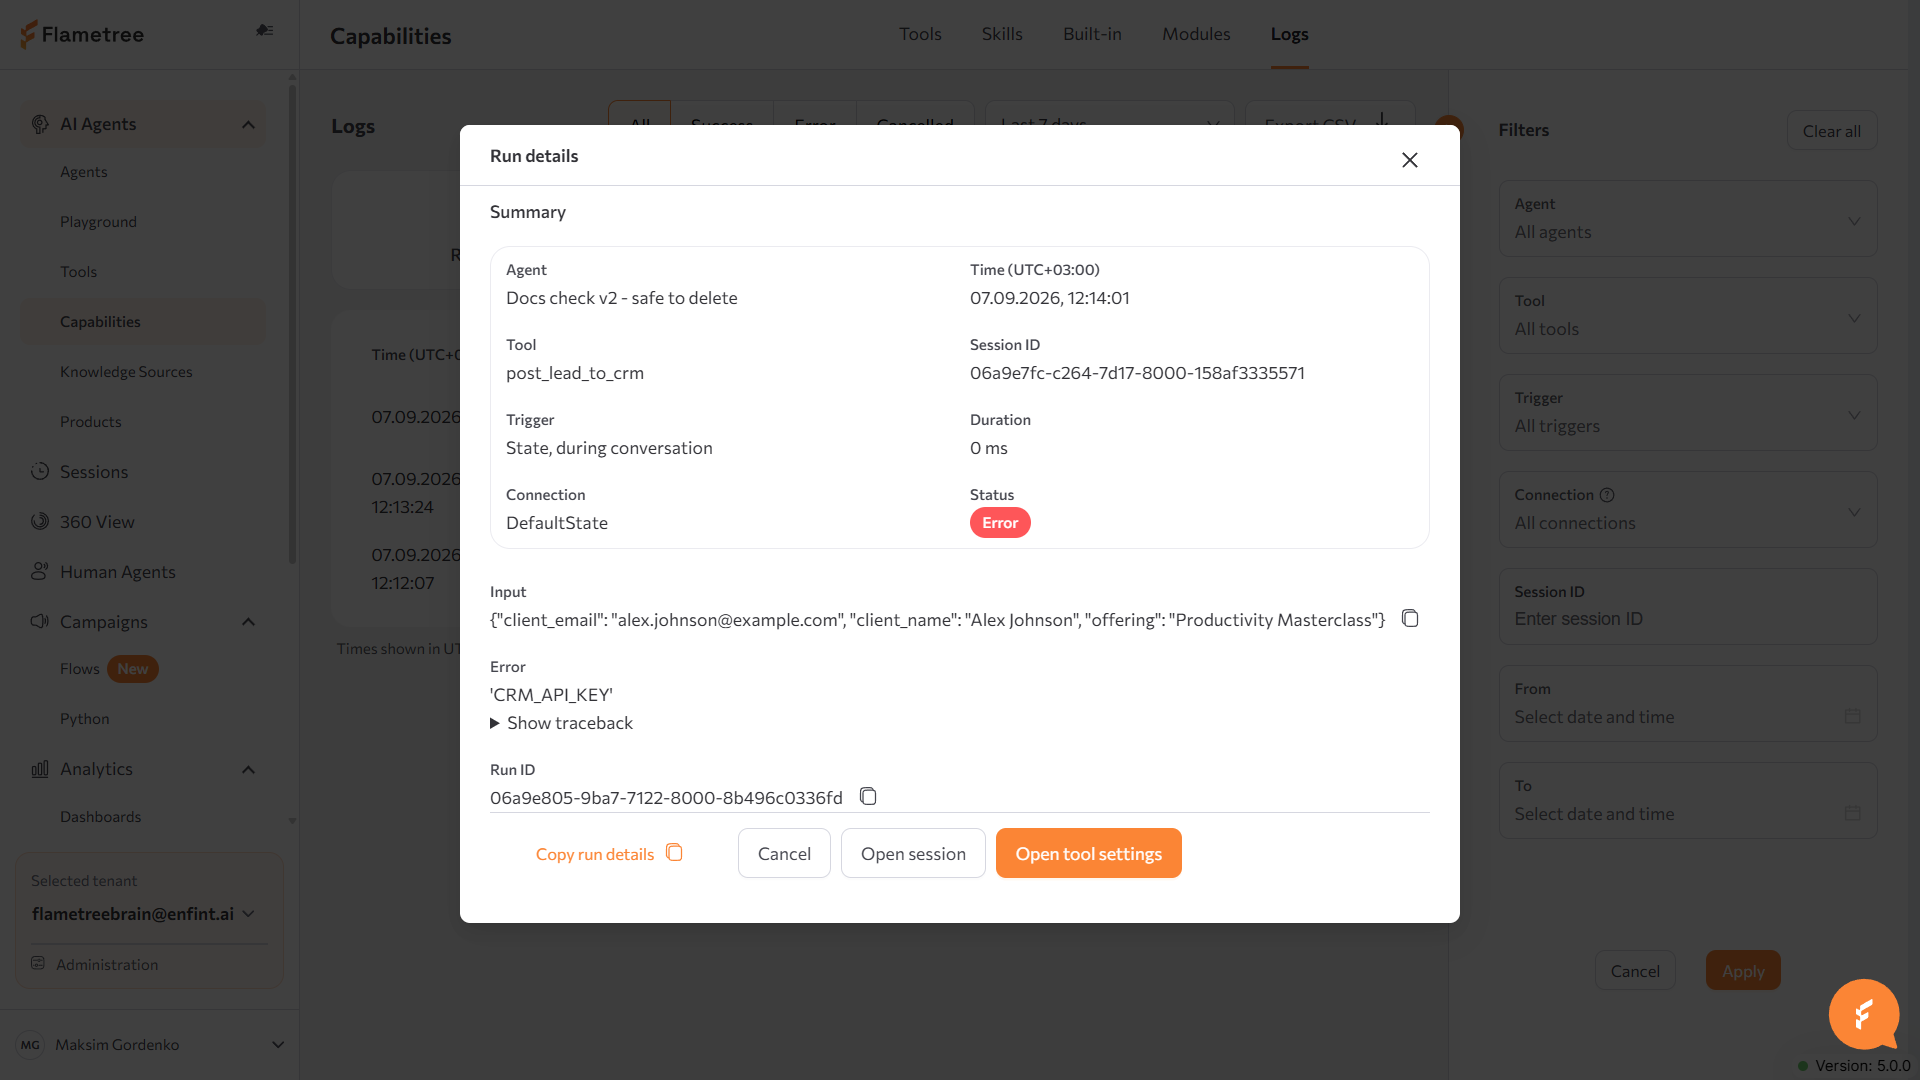
The Logs tab lists every tool call in your tenant. Filter by status (All/Success/Error/Cancelled), time period, agent, tool, trigger, connection, or session ID. Each row shows when the call ran, which tool and agent, its trigger, duration, and status.
Click a row to open Run details: a summary (agent, time, tool, session ID, trigger, connection, duration, status), the call's Input, its Output on success or Error with an expandable traceback on failure, and the Run ID. From there, Open session jumps to the session the call happened in and Open tool settings jumps to the tool.
Export CSV downloads the filtered list. Run data is kept for 90 days.
Test tools in the Playground
Test a tool built in Capabilities in a safe chat before customers reach it.
- Make sure the agent is saved, restarted if it shows Restart required, and running.
- Open the Playground and select the agent.
- Send a message the tool should handle — for example, ask about an order if the tool looks up orders — and check the reply for the tool's result.
- To confirm what happened behind the reply, open the Logs tab and find the call.
Common issues
- The Add tool button is disabled. Your role doesn't include tool permissions — ask your administrator. See Roles and permissions.
- A tool or skill built in Capabilities won't connect to my agent. That agent is still on the classic editor. Either attach a tool group instead (see Tool Groups (Legacy)), or move the agent to the new workflow editor first.
- A skill won't save, with "This skill cannot be saved yet." One of its tools failed validation — open the tool's setup in the skill and fix it.
- The agent never calls the tool. Check, in order: the tool is connected and the agent is saved and running; if the agent was running while you changed the tool, stop it and start it again. Then check the Logs tab to see what the model considered.
- The tool is called but fails. Open the failed run in Logs to see the error, then check the Python implementation and confirm that all files and requirements are uploaded.
Related pages
- Configure an Agent — the agent page for the new workflow editor, where tools and skills are connected to states, transitions, and events
- Tool Groups (Legacy) — the earlier way to build and attach tools, for agents still on the classic editor
- Agents — create and manage agents
- Playground — test an agent without connecting a channel
- Knowledge Sources — give agents content to answer from, without tools
- Roles and permissions — who can create, edit, and attach tools and tool groups